Showing posts with label Big Shot. Show all posts

Sunday, June 19, 2016

Stamp Review Crew: Flower Shop Edition

Welcome to the latest Stamp Review Crew Blog Hop!  This session we are reviewing the Flower Shop stamp set.  This one has been around a while (an oldie but goodie).  The Review Crew loves to dust off a set and come up with fresh new ideas!

When a new catalog comes out I always flip to the back and check out the Big Shot accessories.  Happy happy times when there are new Framelits especially for boxes and bags.  This time we have a super cute Popcorn Box Die.  I could not wait to make something with it.
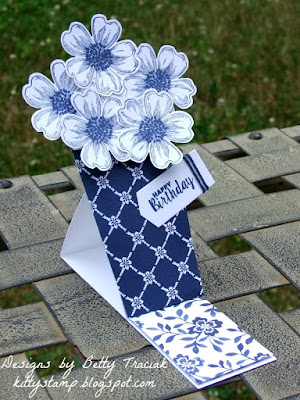
I designed an easel card that folds flat for mailing.  (If you are putting it in a regular size envelope pay attention to the height of the flower arrangement.  Mine turned out to be just a tad too tall.  I will have to make a pretty matching envelope with the Punch Board!)
The vase and pull-out insert are made with the Popcorn Box Framelit.  
The many styles of flowers in the Flower Shop set give lots of options for different looks.  The first card is more realistic and second is more artsy.  I thought the pink smudgy abstract design of the Blooms and Bliss DSP looked like handblown glass and the textured flowers were a good contrast.

I did a video tutorial if anyone is interested in recreating this:

To continue with the Blog Hop please click on the buttons below.   Lots of great ideas for the Flower Shop set await!


This way to Kelly's Blog!


And this is the way to Nikki's Blog!


SUPPLIES: 

BLUE CARD:
Stamps:  Flower Shop, Ready to Pop
Paper: Whisper White,  Floral Boutique Designer Series Paper
Ink:  Night of Navy Classic Ink
Punches:  Pansy, 2-1/2 Inch Circle
Accessories:  Night of Navy Thick Baker's Twine, Stampin' Dimensionals, Tombo Adhesive
Big Shot:  Popcorn Box Thinlit 

PINK CARD:
Stamps:  Flower Shop, Ready to Pop
Paper: Whisper White,  Blooms and Bliss Designer Series Paper
Ink:  Pink Pirouette, Sweet Sugarplum, Rich Razzleberry Classic Ink
Punches:  Pansy, 2-1/2 Inch Circle,  1 Inch Circle
Accessories:  Stampin' Dimensionals, Tombo Adhesive
Big Shot:  Popcorn Box Thinlit 

Tuesday, March 1, 2016

Pyramid Pals Basket and Purse

Getting the tutorial for my Pyramid Pals Basket from the Stamp Review Crew Blog Hop took me a bit longer than I had hoped.  One good thing though is that in the meantime I realized the basket could be flattened to make a really cute purse.  And then I got on a roll and made a favor box version too.  So this is Three-For-the-Price-of-One tutorial.   (Oh and check out the ribbon on the first project...watch the video to see how easy it is!)

I just love the unique shape of these:
Here it is as a basket with bold contrasting DSP

A more subtle paper

Side view


With a clasp to make a clutch 


Or as a spunky little favor box
And now.... the tutorial!

I would love to see your version!  Leave me a message with a link so I can see your creation!

Supplies:
For all projects:
Big Shot: Pyramid Pals Thinlit Dies
Adhesive:  Tombo Multi Purpose,  1/8" Score Tape 

Black and Yellow Basket:
Paper: Botanical Gardens Designer Series Paper, Lost Lagoon cardstock
Punches:  Pansy, Petite Petals, 1/2" Circle
Accessories: Botanical Gardens Designer Washi Tape, White Organza Ribbon, Epoxy Stickers

Yellow Basket:
Paper: Perfectly Artistic Designer Series Paper,  Blackberry Bliss and Pear Pizzazz cardstock 
Punches:  Petite Petals, Bird Builder
Accessories:  Brights Candy Dots

Purse:
Paper: Botanical Gardens Designer Series Paper
Big Shot:  Tags and Labels Framelits
Accessories:  Botanical Gardens Jewels,  small magnets

Favor Box:
Stamps:  Party Pants
Paper:  It's My Party Designer Series Paper Stack,  Pool Party cardstock
Ink:  Basic Black Archival
Punches:  Ballon Bouquet
Accessories:  4" X 6" Cello Bags, Melon Mambo 1/4" Cotton Ribbon

Wednesday, May 14, 2014

Hamburger Box Critters - Set Three

The critter collection continues to grow!
First we have a little lady moose with dreamy blue eyes and and pouty lips.  The soft colors and tiny hearts on the new Lullaby DSP are a whimsical addition to the herd.
Next is a not-so-scary bat.  Those little fangs couldn't hurt anyone could they?
And last to the picnic is a ladybug.  The body is made with the red-checked Maritime DSP which reminds me of a picnic tablecloth.

Here are a few tips for creating each:
Moose:
For the eyelashes snip partway into a one inch wide strip of black cardstock with the Fringe Scissors.  Roll around the barrel of a pen to curl.  Glue to eyelids which are circles cut in half.


To make the lips,  use tip of the Mosaic punch to make the upper and lower lip indentions.  Use a scissors to round off the sharp edges.  Cut in half lengthwise.

Bat:
For the wings, use the largest smooth Circle Framelit.  Cut the circle in half.  Score 1/2" from the end.   Starting at the scoreline,  punch the upper wing with the Large Oval Punch and the lower wing with 1-1-1/4" Circle Punch.


LadyBug: 
The black wing section is the "leftover" piece when the largest Circle Framelit is used to cut two circles that almost overlap.  You could also use the 2-1/2" Circle Punch to make this.

Moose Punches Etc:
Eyes: Small Oval, 1/4" Circle,  1/8" Handheld
Eyelid: 1" Circle
Eyelashes: Fringe Scissors
Lips: Large Oval, Mosaic
Antlers: Autumn Accents Die
(Cardstock colors: Lullaby DSP, Rose Red, Whisper White, Basic Black, Sahara Sand)

Bat Punches Etc:
Eyes: 3/4 Circle, 1/2" Circle, 1/8" Handheld
Fangs: Petite Pennants Builder
Eyes: Small Oval, 1/4" Circle
Wings: Largest Circle Collection Framelit (cut in half), Large Oval, 1-1/4" Circle
(Cardstock: Basic Black,  Whisper White, Rose Red)


Lady Bug Punches Etc:
Head: Second smallest Ovals Collection Framelit
Eyes:  Small Oval (cut in half), 1/4" Circle (cut in half) 3/4 Circle, Owl Builder Punch (middle circle for pupil)
Mouth: Extra Large Oval
Cheeks: 1/8" Handheld
Spots: 1/4" Circle
Wing section: Largest Circle Collection Framelits.  (Could also use 2-1/2" punch)
Antennae:  Modern Label ( cut in half lengthwise), Boho Blossom
(Cardstock: Maritime DSP, Basic Black, Whisper White, So Saffron, Pool Party)

Friday, May 9, 2014

More Hamburger Box Critters

Thanks everyone who commented on Stampin' Connection and Splitcoast Stampers where I posted yesterdays Hamburger Box Critters or here on my blog.  These are really so fun to make.   I tell ya they are addicting.  The more I make the more ideas pop in my head!  I started a list of possible ideas and it just keeps growing.

These are the three I make today:
 This guy doesn't look very crabby, in fact he looks pretty darn pleased to be here!
 But Mr Zebra has a bit of an attitude sticking out his tongue!
And the sweet little Giraffe looks a bit concerned by all the commotion.
The personalities emerge as I create them-- it is often a surprise as I keep changing my mind as I go!

Most of the shapes are pretty self explanatory but there a few little tricks for each animal.
Crab:
For the pincers, punch the Extra Large Oval piece first.  Then use the tip of Triangle Punch to take a little bite out of it.

Zebra: 
The nostrils are the leaves on the branch of the Bird Builder punch.  Trim off the single leaf at the end of the branch.

Giraffe:
I thought this idea was pretty cool!  The head knobs and ears are diecut with the safety pin framelit from the new Baby's First Steps collection (available June 1).    Cut two yellow and two brown pieces.  Cut the brown pieces in two and glue the tip on the yellow diecut.
The bottom brown piece becomes the inside of the ear.  The outer ear is trimmed from the largest Floral Frames framelit.
Floral Frames diecut trimmed to form the outer ears
Bottom half of the safety pin layered on the Floral Frames piece.


Also: A tip for adhering the little "pleats" at the corners.  A really strong adhesive is required.  I was having a bit of trouble yesterday with the corners staying stuck together but today I had much better luck by trimming the Sticky Strip at an angle.  It really didn't take long once I got the pattern down.

As time allows I will post more critters!  Thanks for stopping by and I really do appreciate those who take time comment!

Crab Punches:
Eyes: 1-3/8" Circle (cut in half), 1-1/4" Circle, 3/4" Circle
Mouth: 1-3/4" Circle
Legs: 2-1/2" Circle
Pinchers: Modern Label, Extra Large Oval, Triangle
(Cardstock colors: Rose Red, Whisper White, Basic Black)

Zebra Punches:
Eyes: Small Oval, 1/4" Circle
Tongue:  Extra Large Oval
Ears: Extra Large Oval, Large Oval
Nose: Extra Large Oval
Nostrils: Bird Builder Punch (clip the end leaf)
(Cardstock: Kaleidoscope DSP, Basic Black, Pink Pirouette, Whisper White, Smoky Slate, Rose Red)


Giraffe Punches:
Eyes: Small Oval, 1/8" Handheld
Eyebrows:  Bird Builder (piece of the stem of the leave spray)
Ears:  Floral Frames Collection Framelit (largest framelit), Baby's First Framelits (safety pin)
Head Knobs: Baby's First Framelits (safety pin)
Nostrils: 3/4" Circle
(Cardstock: So Saffron, Basic Black, Whisper White, Early Espresso)

Thursday, May 8, 2014

Hamburger Box Critters

It is looking a bit like a zoo in my craft room (and a bit of mess)!  No pics of the post-creation craft room whirlwind (believe me you do NOT want to see that!) but I do have cutie pie animal pics.
This menagerie is made with the new Stampin' Up Hamburger Box Bigz XL die.

Mr Alligator was the first critter to join the zoo.  Love the teeth on all three sides!  They are made with the 1" Square Punch set on an angle.
Then came Mr Horse:
I was going for a monkey but once I had the base assembled I thought the Baked Brown Sugar looked more equine.  His teeth are also made with the 1" Square Punch cut in half to form rectangles.  The forelock is made with the tail piece of the bird from the Bird Builder Punch.

So I tried again for a monkey with a Chocolate Chip colored Hamburger Box.  Guess what?   It turned in to a bear!
I think this guy looks like Baloo the Bear from Jungle Book.

And last a hippopotamus joined the crowd:
I have ideas for a few more critters so hopefully tomorrow I can get time to make some more!  Playing with the die has given me some ideas for ways to modify the box into other things so keep a look out for those too!

Below is a list of all the punches and framelits for each animal.  I think they are pretty easy to figure out from the pictures but let me know if you have any questions!

Alligator Punches:
Eyes: Extra Large Oval, Small Oval and 1/2" Circle
Nostrils: 3/4" Circle
Teeth: 1" Square

Horse Punches:
Eyes: Small Oval, 1/2" Circle
Ears: Extra Large Oval, Large Oval
Forelock: Bird Builder
Nostrils: 1/8" Handheld
Teeth: 1" Square- cut in half

Bear Punches:
Head: Largest smooth Circle Framelit, Third Largest smooth Ovals Framelit
Ears: 1-3/8" Circle, 1" Circle
Eyes: 3/4" Circle, 1/2" Circle
Nose: Small Oval

Hippo Punches: 
Eyes: 1-1/2" Circle, 1-1/4" Circle, 3/4" Circle
Nostrils: 3/4" Circle
Teeth: 1" Square- cut in half

Sunday, April 27, 2014

Dress Up Bridal Shower Favors

Leah co-hosted a bridal shower for her friend recently and we made favors to hold wrapped Hershey Nuggets.
We adapted instructions from Frenchiestamps.com.  (You can see the original video HERE. )

There are several things we did a little differently:  1. We added a second layer to the skirt to make it floor length.  2. The Delicate Designs embossing folder made a pretty lace-like pattern on the dress front.   3. White Taffeta ribbon was wrapped low to give a dropped waistline and one tiny pearl added at the neckline.

Also we wanted the box to fit the two nuggets more snuggly so the measurements were tweaked.  The new measurements are:    2-3/4" X 3-1/2", scored at 3/4" on each side.  This makes a box where the nuggets fit quite tightly and bulges slightly at the sides.  I liked that as the candies did not fall out when transporting the favors.  I recommend trying one first before cutting a bunch to make sure you like this snug fit.  A strong adhesive is necessary for this to stay together.
Leah saw an idea for an Advice Box on Pinterest.  We made one with a purchased box and die cut letters with the Typeset Alphabet Dies.


Supplies:
Stamps: It's a Wrap (Digital) for the candy wrappers
Cardstock: Whisper White
Big Shot: Dress Up Framelits, Delicate Designs Embossing Folder, Typeset Alphabet Bigz Dies
Accessories: 3/8" Whisper White Taffeta Ribbon, Pearl Basic Jewels, Large Pearl Basic Jewels, Silver Elastic cord (retired)

Sunday, April 6, 2014

Stamp Review Crew: Oh, Hello Edition

Welcome to the newest edition of the Stamp Review Crew Blog Hop.   Oh, Hello is our featured stamp set for this round.  Our links are permanent so you can hop anytime- now or in the future.  Also you can click on the banner above to go to the Stamp Review Crew Blog which has all the links to participating blogs.

Inspiration for my project came from a corrugated cardboard display I saw in a store.  I thought it was neat the way the accordion folded sections intersected.
As I was thinking about recreating it, I decided to use the Designer Rosette Bigshot Die to cut the base.  That way the scoring is already done and it has pretty decorative edges to dress it up a bit.

This folds flat so you can mail it.   Here is the top view:
The Oh, Hello set has versatile and fresh geometric images.  Here a couple of chevron shapes are popped up for some dimension.
It might not be obvious but the green chevron background under the flower image below is also one of the stamps from this set.
The Oh, Hello image fits perfectly in one of the Word Bubbles Framelits.  (I snipped the little notch off with a pair of scissors.)
For a bit of texture I added buttons and a pleated piece of chevron ribbon.  There are so many ways this could be personalized!
If you would like the details for making the base continue reading or you can skip to the bottom and click on the buttons to continue with the hop.

Rosette Die Accordion Base Directions:
1.  Die cut two pieces of DSP or card stock with the Rosette Designer Die.  Cutting on the scoreline, trim one section away.
 2.  Use the Paper Trimmer to cut 1-1/4" slits along the zigzag edge.  Make the slits on the scorelines at the 2nd, 8th, 14th and 20th spaces.
Place the zigzags at the top of the trimmer.  Line up the scoreline on the cutting line.   Cut down to the 1-1/4" mark.
3.  Fold in half then fold each side back so one section shows at the edge.
4.  Fold one piece with valley, mountain, valley and the second with mountain, valley, mountain folds.  Interlock the two pieces at the slits.  Have fun decorating!

Thank you for stopping by!  Please click on one of the buttons below.   The Previous button will take you to Heidi's blog and the Next button to Tanya's.  Great projects whichever way you choose to hop!  The Stamp Review Crew will be back in two weeks when we will feature another beautiful stamp set!