Showing posts with label Techniques. Show all posts

Monday, September 4, 2023

Stamp Review Crew: Earthen Textures


https://stampreviewcrew.blogspot.com/2017/10/beautiful-you.html


Recently I used one of the images from the In the Moment stamp set to embroider a small project.   I enjoyed that so much that I perused the catalog for other sets that I thought would be fun to embroider.   The Earthen Textures seemed like a great choice.  This time I challenged myself to see if I could use all SU materials for the embroidery. 


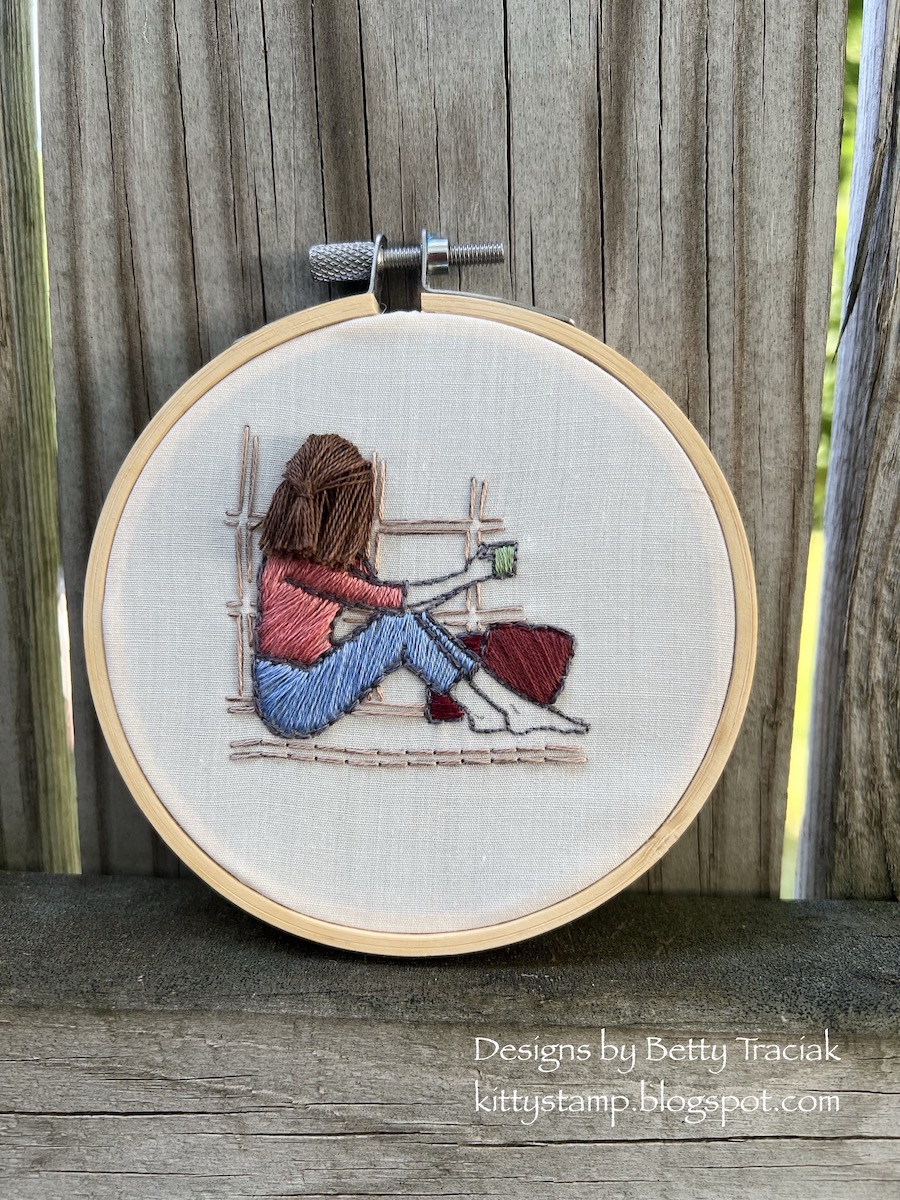
First I stamped the image on light cloth.  (I have a video of the In the Moment embroidery project including tips for stamping on fabric.  It can be found HERE.)  

I used the Natural 1/4" Wavy Trim to embroidery the wheat.  I like that wispy fibers of the trim look like the beard on a wheat stalk.  To deconstruct the trim I used scissors to clip the central thread holding the trim together.  Then it was easy to pull the outer threads apart.  This resulted in four strands of nicely textured thread.  


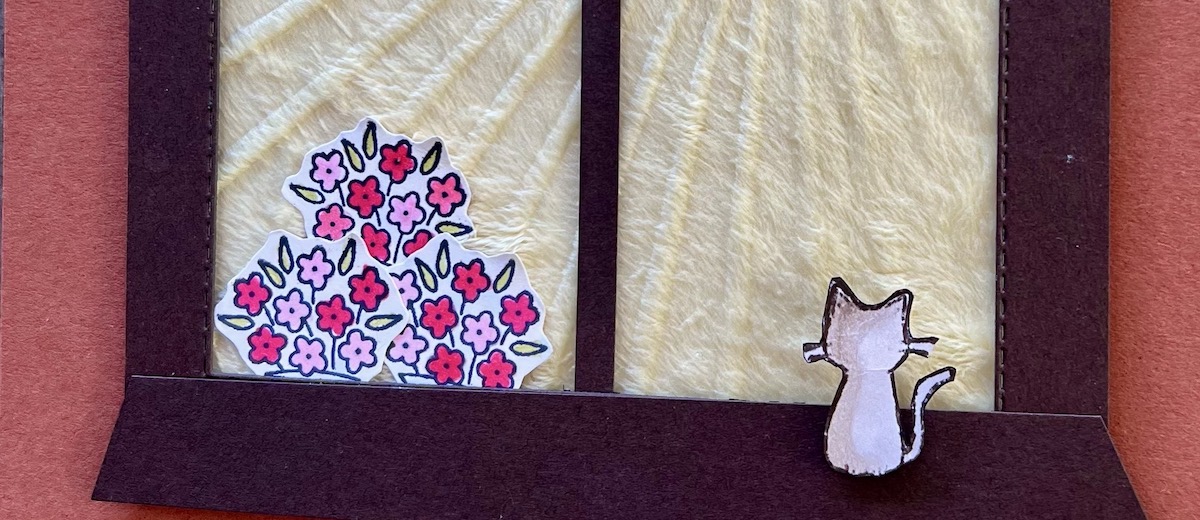
This picture shows the placement of the stamped images and the wheat once it was stitched.  


For the vase I used In-Color Jute Trim.   This has three strands of fibers twisted together.   I untwisted the strands which resulted in a lovely waved fiber strand.  I found that it was best to stitch with a fairly short length thread so that it did not fray too much and the waves were prominent.  


To make it look like the vase was siting on something I added five long horizontal stitches.    For this I again used the Natural Wavy Trim but this time I used the center strand.  Instead of clipping the central strand as in the second photo above I clipped the outer strands preserving the center strand.  This is a very soft and pretty strand that looks like it is chain stitched.  


I throughly enjoyed making this and have a few more stamp sets that I think would be pretty stitched so you may see more embroidery projects!


I'm so glad you have visited today and you can click on the buttons below to see more ideas from the talented and awesome Stamp Review Crew!    


To Terri's terrific creation!


To Stacey's project!

Stamps:  Earthen Treasures 
Ink:  Classic Gray Ink
Accessories:   Natural 1/4" Wavy Trim,  In-color Jute Trim 

Monday, July 31, 2023

Stamp Review Crew: Rays of Light Bonus Hop


Hello and welcome to the latest Stamp Review Crew Blog Hop!   Our international crew highlights one Stampin' Up stamp set on each blog hop.  Hops are the first and third Mondays of the month and are a great way to get lots of ideas for using a set!   


If you click on the banner below you will be taken to the Stamp Review Crew website which has a complete list crew members and you can see all the past hops as well.

https://stampreviewcrew.blogspot.com/2017/10/beautiful-you.html


We are adding an extra bonus hop this month and our focus is the background stamp Rays of Light.  This is the second time our crew is highlighting this great stamp.   So after you have circled this current hop you can click HERE to see even more wonderful ideas!

The background for my project is fabric.  I used my iron to heat set the Rays of Light image on minki fabric.  Areas are depressed or "debossed" creating the design.  The result is a soft wonderfully textured background. To learn how to do this check out my video near the bottom of the post.  It is actually very easy to do!  I also have more examples of projects using this technique which can be found HERE.


The kitty, flowers and sentiment are from the Warm Welcome set (an Online Exclusive).  To make the kitten appear to look out the window, I inked just the edges with a Stampin' Write Marker omitting the face and legs.  


Below is the video of how I did this fun project!


I'm so glad you have visited today!  Please click on the buttons below to see more ideas for using the Rays of Light stamp set.  Have fun hopping!   


To Stacey's creation!


To Jay's project!

Stamps:  Rays of Light, Warm Welcome 
Paper:   Copper Clay, Early Espresso and Basic White cardstock
Ink:  Tuxedo Black Momento Ink, Stampin' Blends
Accessories:     Mini Stampin' Dimensionals, Tombo Glue, Rectangle Die

Monday, June 5, 2023

Stamp Review Crew: In the Moment 2023


Welcome to the latest Stamp Review Crew Blog Hop!  We have some new members joining our crew.   Looking forward to all the wonderful creative ideas they will bring! 

If you click on the banner below you will be taken to the Stamp Review Crew website which has a complete list crew members and you can see all the past hops as well.

https://stampreviewcrew.blogspot.com/2017/10/beautiful-you.html


Our stamp set this time is the beautiful In The Moment stamp set.   I thought the line art images would be pretty done with embroidery.   I learned to embroider from my mom and grandmother and still enjoy this relaxing hobby.  It was fun to combine two of my hobbies for this project!

I stamped the image on light colored cloth and then
used the lines as guidelines for stitching.


Her hair is done so the strands are free.  
I was even able to keep the pulled back style with a little half ponytail!


This was so much fun to do!  Now I want to try embroidering with other stamp sets.  I think some of the flower sets would be lovely!  Below is the video with all the how-tos!


I'm so glad you have visited today!  Please click on the buttons below to see more ideas for using the In The Moment stamp set.  Have fun hopping!   


This way to Kim's cute project!


Or this way to Terri's terrific creations!

Stamps:   In the Moment
Ink:  Gray Classic Ink
Accessories:   Tear and Tape
Non SU:  Emboirdery Thread:   DMC 839, 841   Anchor: 0400, 0121, 0261, 1023, 0045   4 inch wooden hoop,  

Wednesday, July 27, 2022

Slimline Partial Die Cut Video Tutorial


 My video tutorial for the Slimline Partial Diecut card has been posted on Splitcoast Stampers!   


As the name implies this is fun shaped card is made with a partial diecutting technique.  It is very quick and there are so many possible variations.  


This works wonderfully with double-sided designer paper.  


An added inside layer for stamping and a greeting


The angle is cut to follow the design on the paper.


I sponged soft colors of ink on the background.  
Also a little bit of the inside layer peeks out  along the edge.


Another idea is to seal the edges to form a pocket.


A pretty bookmark fits perfectly.


This card shape is one that I came up with way back in 2015.  I really liked the original card and thought I would recreate a version with current supplies.   The new one is smaller than the original.   You can see the original one is this post.   All the little pearls make it special!

For this smaller size, start with a 3" X 3" piece of cardstock. Score at 3".


Click below for the video tutorial.  The written tutorial can be found on the Splitcoast Stampers website.  
There is also place to upload your projects inspired by this idea.  It can be found HERE.   I would love to see what you create!  


Card with Belly Band: 
Stamps: Butterfly Brilliance 
Paper:  Basic White, Basic Black Cardstock,   Perfectly Penciled Designer Series Paper
Ink:  Momento Tuxedo Black Ink
Stampin' Blends:  MInt Macaroon, Pool Party, So Saffron, Pale Papaya


Card with Sponging: 
Paper:  Basic White Cardstock,   Perfectly Penciled Designer Series Paper
Ink::   Petal Pink, So Saffron,Mango Melody, Old Olive  


Card with Bookmark: 
Stamps: Wondrful World, Art Gallery
Paper:  Basic White Cardstock,   Wonderful World Designer Series Paper
Ink:  Rich Razzleberry, Old Olive


Monday, June 20, 2022

Stamp Review Crew: Rays of Light


Hello and welcome to the latest Stamp Review Crew Blog Hop!   Our international crew highlights one Stampin' Up stamp set on each blog hop.  Hops are the first and third Mondays of the month and are a great way to get lots of ideas for using a set!   Click on the banner below to see a complete list of Crew members and see all the past hops which we keep active.  


We are using the very cool background stamp Rays of Light for this edition.  I am looking forward to seeing what the crew members create as this stamp has oodles of possible ways it can be used.

Our daughter-in-law and I had a chance to spend an afternoon together in the craft room.  What a fun time!  As she had never heat embossed we pulled out different powders and stuff to experiment.  She came up with the very neat background for this card by using clear embossing powder, various markers and then spritzing it with water.  


It created a groovy tye-dye effect.  Since we know a special someone who has a big selection of tye-dye shirts and socks it was perfect for a hip Father's Day card.  

TIPS for creating this effect:  First heat emboss the rays with clear embossing powder on white cardstock.   Then scribble random sections with Stampin' Write Markers.  (Three colors were used here.)  When scribbling don't completely fill in the white areas.   Then spritz with water.  After the colors have bled together a bit blot with a paper towel. 


I tried to get a photo to show the clear embossing a bit better.   The stamp is created with a distressed effect for the rays really giving this a unique look.    


Thanks so much for hopping with us!  Have a lovey sunshiny day!

Please click on the buttons below for an array of ideas for this stamp set!


This way to Heidi's Blog!


Or this way to Cindy's creations!


Stamps: Rays of Light , Hippest Hippos
Paper:  Blackberry Bliss, Petal Pink,  Basic White Cardstock 
Ink:  BlackBerry Bliss Classic Ink, Stampin Blends, Stampin' Write Markers.  
Accessories:  Clear Embossing Powder,  Loose Flower Flourishes,  Stampin' Dimensionals, Tombo Glue
Big Shot:   Hippo Dies, Beautiful Shapes Dies

Friday, March 25, 2022

Gilded Ribbon Video Tutorial


I am happy to share a video tutorial that I made for Spiltcoast Stampers.  It has a technique for applying Gilded Leafing to ribbon to add a special touch of elegance to a project.


The ribbon remains flexible even with the leafing on it so it can be bent and folded.   I have used for creating a woven background on this card.

Lots of gold to accent the crane.

I have previously posted several of the projects shown in the video.  The details of those can be found on these posts:  Art Gallery Cards   Blessings of Home Hoop Decor.

The center of the flower also has gold leafing.


Sheer ribbon is fun because the gilded ribbon shows through.


A teeny tiny bit of gilded ribbon tucked in a the edge.


You can also see the written tutorial and gallery of projects by clicking HERE.


Crane of Good Fortune Card:

Wednesday, November 3, 2021

Splitcoaststampers Falliday Fest Tutorial

Fun things are happening on the Splitcoaststampers site!  The Falliday Fest is an annual event with tutorials, challenges and prizes.  My tutorial for the Disappearing Nine Patch technique is the featured project today!   


You can see the written tutorial HERE and can also view the gallery of projects made by other crafters using the tutorial.   You can upload your creations here so we can all enjoy them!  (To upload to the correct gallery put it under Techniques Spotlight>Holiday Blitz Gallery>Disappearing Nine Patch Card)

(I had planned to add some new projects myself but I am having issues with my computer not importing photos.  Until I get that resolved I am not able to put new things on my blog or upload to Splitcoaststampers. 😞)  


Thursday, April 29, 2021

Zippered Paper Pouch Video Tutorial


My video tutorial for making a Zippered Paper Pouch has been posted on Splitcoast Stampers!  


This one has been in planning/progress mode for quite a while.   I made my first vinyl covered projects including a pouch last July and have been dabbling with ideas since that time.   In September I did a video of general concepts for using vinyl + paper for Spiltcoast Stampers.  More ideas kept popping up and soon I was zipping through my little stash of Pellon iron-on vinyl.  I discovered that you can buy it by the yard at Joann's.  Sale + a coupon and I was in business for making some really fun stuff! 

The Zippered Paper Pouch video was my first attempt at videotaping at the my sewing machine.   There was a bit of a learning curve and a few hiccups getting that all squared away.  I could have made a blooper reel about as long as the finished one!  


The written tutorial with step-by-step pics can be found on the SCS site. 


Here are links to some of my other vinyl projects:

VINYL BASICS: Video and notebook

LANYARD SCISSORS HOLDER and PENCIL POUCH

COUPON HOLDER and other Pampered Pet projects  

KITTY KEY COVER