

The mummies started out as Cadbury's Halloween Scream Eggs.

I wrapped them with strips of gauze and added googlie eyes. It's funny how they ended up with different expressions.


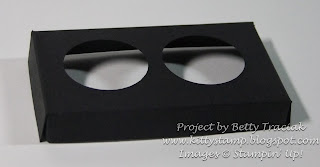


The box is designed with an insert that has holes to hold the mummies in place and has a window sheet peekaboo front so the little guys can peek out.

The box lid has DSP panels and is stamped with images from the Best of Halloween set.
MUMMY BOX TUTORIAL:
Box Bottom:
1. Cut a 5" X 6-1/2" piece of black cardstock. Score at 1-1/2 on all sides.

2. On the side that will be the box front, measure 1/2" from the score lines and cut that section away.


3. Cut on score lines to form tabs and trim as shown.

4. Cut a piece of acetate window sheet slightly smaller than 1-1/2" X 3-1/2". Attach to inside of box front with Mini Glue Dots.
5. Assemble the box using Sticky Strip.

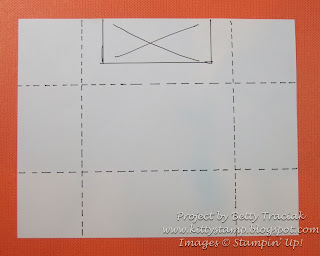
Box Insert:
1. Cut a 3" X 4-1/2" piece of black cardstock. Score at 1/2" on all sides.
2. Using the 1-1/4" Circle Punch, punch to circles from a Post-it Note so you have a bit of the sticky on it. Position these circles in the center section of the box.

3. Flip the 1-1/4" Circle Punch over, center the Post-it Notes and punch again.


4. Cut on score lines to form tabs.
5. Assemble with Sticky Strip.

6. Place the insert in the bottom of the box.
Box Top:
1. Cut a piece of black cardstock slightly smaller than 7-1/8" X 8-5/8". Score at 2-1/2" on all sides.
(I cut my cardstock about 1/16" smaller than the given measurements so the box top fits without being too sloppy.)
2. Cut on score lines to form tabs.
3. Assemble box top with Sticky Strip.
Box Decorations:
1. For the box front cut a piece of Sweater Weather DSP 2-1/4" X 3-1/4". Stamp the image with Black Stazon-on Ink.
2. For the box sides cut two pieces of DSP 2" X 2-1/4".
3. Wrap a Candy Dot Brad around a looped piece of Black Chevron Ribbon. Add a small button from the Regals Designer Buttons with a Mini Glue dot.

4. Stamp the Trick or Treat image on DSP with Black Staz-on Ink. Die cut with the Bitty Banners Framelit. Bend into shape and adhere with Stampin' Dimensionals.
Tips for the Mummies:
I cut a strip of gauze in half lengthwise so it would fray slightly. I used transparent tape in a few inconspicuous places to hold the gauze in place.
These are so cute!!! Give 'em a try! I would love to hear if you like this tutorial. I will be back soon with the Holly Jolly Greetings Kit details.
So adorable! I just love your creations.
ReplyDeleteThanks Jackie! Have a super day!
DeleteSuper cute.
ReplyDeleteSo cute! I could see doing these for Easter too!! Thanks for the inspiration!
ReplyDeleteThank you for the great directions and pictures. So cute! My grandchildren will love these.
ReplyDeleteOh, these are so cute!! My daughter wants to make them for her classmates; thanks so much for sharing the tutorial!
ReplyDeleteShine on!
Kelley
adorable!
ReplyDeleteThese are very nice. Thanks for sharing.
ReplyDelete