Monday, March 26, 2012

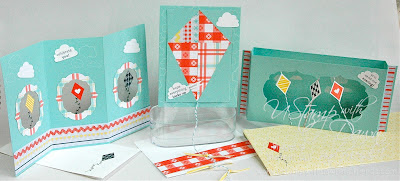
Send Me Soaring Shadow Box Card set


A KITE  
(Author unknown)
I often sit and wish that I
Could be a kite up in the sky.
And ride upon the breeze and go,
Whichever way I chance to blow.

The Cards with Cool Moves UStamp session has just kicked off and my first project has been posted!    I love the springlike feel of these cards.  

The tutorial for this card set and more than 40 more are available from UStamp-- to learn all about it please click on the blinkie below.

Thursday, March 22, 2012

Outlined Occasions My Digital Studio Hybrid Card

It couldn't be much simpler than this!
I used My Digital Studio and placed a single stamp (from the Outlined Occasions stamp set found in the One Big Sale-a-Bration CD) on a 5" X 7" card canvas and had it professionally printed through Stampin' Up's print service.  

When it arrived I colored the outline with markers and added two ribbons.  Done!!    (Told you it was simple!)

To make this: 
1.  Open a new project and choose a 7 X 5 landscape greeting card.
2. Add the "Celebrate" stamp from the Outlined Occasions set.
3.  Resize to the following--
4.  The canvas will look like this.
5.  Once it is printed, color with markers and add ribbon!  I used Tempting Turquoise, Indigo Island, Real Red, Lucky Limeade and Tangerine Tango markers.  The ribbons are 1/4" grosgrain in Tempting Turquoise and Real Red.

Tuesday, March 13, 2012

Petite Purse Die Ideas

Stampin' Up! has a new die for the Big Shot!  It makes a cute little purse just the right size for party favors.  Well mine arrived yesterday and of course I had to experiment to see what else I can make with it.  Here are my first attempts--

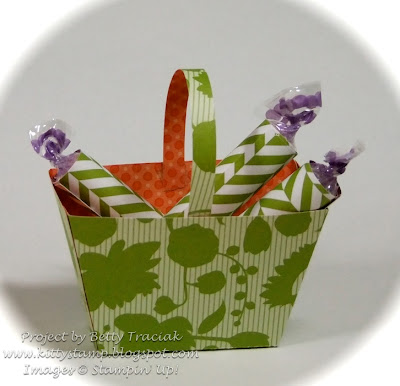
A spring basket:
 A cheerful pot of flowers:
 And a mini basket.
 I had some smarties left from a previous project so I covered a few and tucked them in the basket.

Oh and the paper is new too!  It is called Summer Smooches.  Both the paper and the Petite Purse Die will be available to order in April.

To Make the Spring Basket:
1.  Cut six pieces of DSP 4" X 4".  Lay them one at a time over the portion of the die that has the purse flap.  Tip:  Make sure you have the right side of the paper facing up so the pieces are all identical.

I cut a piece of paper so you can see what is normally cut with the die:
Lay the DSP to be cut over the end with the rounded flap:
2.  Trim the pieces on the score line so you have just the purse front, the flap and the small tab at the side.  Trim off the tip of the flap.

3.  Apply Sticky Strip to the tab of each piece.
 4.  Adhere the six pieces together.  Adhere the remaining side together to form a circle.
5.  Fold on all score lines.  Overlap the purse flaps to interlock to form the bottom of the basket.  Add adhesive where they overlap.

6.  Attach a 12" strip of paper for the handle and add a bow.

To Make the Flower Pot or Mini Basket
1.  Cut two pieces of DSP 4" X 5".  Cut them as for the Spring Basket but make sure that you have the large flap included as well.
2.  Trim on the black lines as shown below.
3.  Apply Sticky Strip to the skinny tabs.  Flip one over and apply Sticky Strip to the bottom tab.  Adhere the two pieces together by the side flaps.  Fold the bottom flaps in.
I appreciate your comments -- that way I know someone is reading this!

Monday, March 12, 2012

St. Patrick's Day Candy Box Tutorial

I needed a small gift box for some St. Patrick's Day mints.  I pulled out my Box #2 die and discovered it was the perfect size but did not open in such a way as to display the mints nicely.  So I adapted it to open from the side.  The tab that is normally at the bottom of the box works perfectly to hold the box shut.  Pretty nifty if I do say do myself!

I used Confetti White paper for the box as it is a sturdier paper.  I stamped the clover leaf from the Every Little Bit set randomly on the box and heat embossed them with Gold Embossing Powder.   I painted the inside of each leaf with Gold Smooch Accent Paint.   The "Happy St. Patrick's Day" is also heat embossed.  I use a bit of retired Gold Stretch elastic around the tab to hold another clover leaf for decoration.

To make the box variation:
1.  Die cut paper with the Box #2 die.  Trim off the tips of the two small tabs and the tab at the far right.  They are marked with "X" below.  The dotted line will be where you cut to form the lid.  I left it on to show how the box goes together and cut it in a later step.  Once you have made the box and see how it goes together you can make the cut at this point.  


 2.  Apply sticky strip as shown.
 3.  Flip the box over and apply a strip as below.
 4.  Assemble box bottom.
 5.  Cut the box lid off on the dotted line.  Keep it in place and adhere it to small tabs.  Pull the covering off the longer strip of Sticky Strip and adhere the flap in place.
6.  View of the box when open.

Wednesday, March 7, 2012

Never Too Old

I just had to make another card with the silly birds made from the Elegant Bird die.  (You can see the other one HERE.)
The stamp "Your never too old to do Goofy stuff" from the Smarty Pants stamp set fit perfectly.  This is a larger card- it fits in business size envelope.  The base is 8" X 9", folded to make a 4" X 9" card.
Here is a side view so you can see the beaks in 3D.

Materials used:
Daffodil Delight base- 8" X 9"
Beyond the Garden Designer Series Paper- 3-/12" X 8-1/2"
Pacific Point, Tangerine Tango, Wild Wasabi, Daffodil Delight cardstock for the birds (Die cut with the Elegant Bird die.)
Whisper White scrap for the sentiment, stamped with Pacific Point Classic ink and punched with the Decorative Label punch.  The layer under it is DSP also punched with the same punch.
Pacific Point Bakers twine for the bow.