Wednesday, January 30, 2013

Love You Lollipop Holder

The next session of UStamp is kicking off on Friday.  There will be more than 40 projects with full tutorials focusing on products from both the Spring and Sale-A-Bration catalogs.   I have had a sneak peek at the designer's projects and wow there are some fun things in store!

I get to show you one of my projects now because it was posted today as an early bonus:
I designed this little holder to display twelve yummy lollipops.   Very quick and very sweet!

Come join the fun!  Clink on the blinkie below to join!!!

Wednesday, January 23, 2013

Dr Who Birthday Card

Our middle son is a fan of Dr Who so for his birthday I made this card with My Digital Studio and the One Big Sale-A-Bration CD.   In the show, the Doctor travels in an unreliable old TARDIS  (Time and Relative Dimension iSpace) shaped like an London police box.
I am also playing along with this week's challenge on the Friday Mashup Challenge blog for the first time.  The challenge is to make a birthday card and/or card with brads.   The brads on this card are digital Vintage Brads that are re-sized and re-colored (love that new feature on MDS 2!) to match.   Vintage Overlays also add a bit of the time-worn feel.

Monday, January 21, 2013

Happy Hello Details

Today is "details day" for my Happy Hello Simply Sent projects from the weekend's Sale-A-Bration blog hop.  (The links are permanent so you can still see all the super projects by the other demos too!)

These projects are easy-peasy!
The bookmarks are made from one card, cut into four pieces.
To make these, fold a card on the pre-scored line.  Using the Tabletop Paper Cutter,  place the fold of the card at the top edge of the guide.  Slice through both layers of the card.  Repeat to cut all four bookmarks.
To decorate them, I used the diecuts from the kit plus stamped images using the "A Little Greeting" set.  (The punches used were the Elegant Butterfly, 1-3/4" Scalloped Circle and 1", 1-1/4" and 1-3/8" Circles).   I kept the embellishments flat so they work when slipped over the top of a page.
The candy bar wrap is fun in that stands up by itself.
To make this:
DO NOT fold on the pre-scored line.  Instead, place the flat card on the Simply Score Board and score 1/4" from pre-scored line.  Fold on these lines.

I used temporary adhesive to hold the candy bar in place then punched two holes at the top and threaded ribbon through.

For the purse:

Score a sealed envelope 1/2" from the edge on the sides and bottom.  Use the paper trimmer to slice off the top fold.
Open the envelope and fold on the score lines to form a box.
Fold the little points under and adhere with strong adhesive.
Add a 1" X 11" handle.

Thanks for visiting today!

Friday, January 18, 2013

Sale-a-bration 2013 Blog Hop

Welcome to the Stampin' Addicts Sale-A-Bration Blog Hop.   Each Stampin' Up demonstrator on the hop is featuring a different Sale-A-Bration product that will be available starting January 22nd.

I chose the Happy Hello Simply Sent Kit to work with.  This kit contains supplies for eight quick and easy shaped cards and coordinating envelopes.  Very cool just as it is intended but it also can be used for a few other equally quick but different uses.

For example, I cut one of the folded cards into four parts to make bookmarks that slip over the top of a book page.
I used the stick-on embellishments that come with the kit plus a few extra punches and the "A Little Greeting" stamp set from the Spring Catalog to make each unique.
Another idea is to use one of the cards to make a stand-up candy bar wrap.  Simply score 1/4" from the center and punch a hole in the top to close it.  I printed the "YUM" label using My Digital Studio and the "One Big Sale-A-Bration" Digital Disk which has all the SAB stamp sets on it.   With My Digital Studio, I was able to the make the image larger than the original rubber stamp set.
And the envelopes can become a little spring purse just the right size for small treats or notecards.
After the hop I will have directions for making this and a few more details of the other projects.   

Now it is time to hop to the next blog.  You can hop forward to see the Paula's creative uses for the very versatile Vintage Verses stamp set or backward to see Heidi's dreamy and detailed Feeling Sentimental creations.  


Sunday, January 13, 2013

Oh Hello

Leah crocheted a sweet star-shaped baby blanket as a gift for our neighbor.  She was working quickly to get it done before the baby arrived and she finished it a few days ago.  Perfect timing as little Abigail arrived today!   

Using the star theme, I made a card to go with it.
First I used My Digital Studio to print the baby's name so the color of ink would match the cardstock.  Then I stamped the "Oh, Hello" with Versamark ink and heat embossed it with Melon Mambo powder.    The new Ovals Collection Framelits made it easy to get the image in just the right place.

The blanket is so bright and cheerful!
Soft and warm for a little one!
Supplies for the card:  My Digital Studio, Oh Hello stamp set, Melon Mambo Embossing Powder, Ovals Collection Framelits, Chevron Embossing Folder, Merry Minis Punch Pack, Cardstock: Whisper White, Island Indigo, Daffodil Delight, Melon Mambo, Pretty in Pink, Burmuda Bay (retired).

Wednesday, January 2, 2013

Pop 'n Cuts Castle Card Tutorial

I was so happy to see the Pop 'n Cuts dies designed by Karen Burniston in the Spring Stampin' Up Catalog.  The intended dress theme is just adorable.  (You can see a card I made using them without modification HERE.)  But in addition, when I get a new Big Shot die I try to think of different ways of using them.   

I used the pop-up portion to make this castle card for the Stampin' Addicts Blog Hop.    ( If you have not had a chance to do the hop, click on the above link to see some AWESOME projects with products from the new Spring Catalog.)
Here is how I made it!

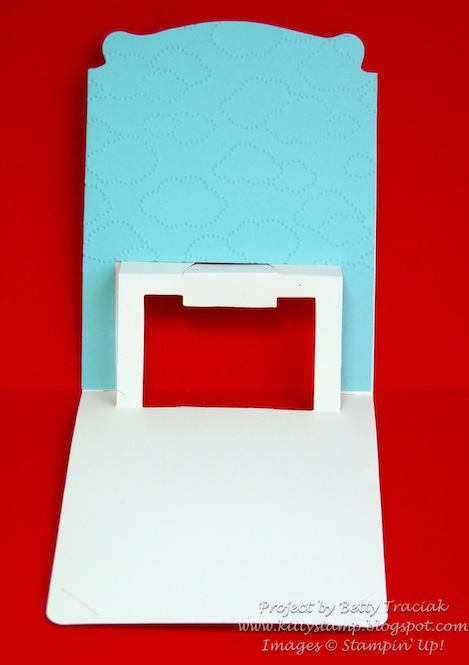
1.  Place the Dress Form Pop 'n Cuts die into the Card Base Pop 'n Cuts.  Diecut with Very Vanilla cardstock.  Trim away the top and bottom of the dress form as shown.
2.  Fold on the scorelines.   Also fold the remaining portion of the dress form down and on the backside tape across the cut to hold it in place.
3.  Cover the upper half of the Card Base Pop 'n Cuts die with Pool Party cardstock.  Run through the Big Shot.  Using the Paper Trimmer, remove a 1-7/8" X 3-1/4" section from the bottom of the piece.  Emboss the top portion with the Cloudy Day Embossing Folder.  Adhere to the Vanilla base.


3.  Cut a 3 X 3-1/2" piece of More Amore DSP.  Use the Paper Trimmer to remove a 3/4" x 2" section from the top center.  Using the smallest Ovals Collection Framelit, cut an archway.  Reserve the cutout portion for later.

4.  Hand cut a curved driveway from Basic Gray cardstock.  Flip the reserved archway portion over and adhere to the driveway.
5.  Adhere the castle to the pop-up portion of the base.
6.  Turn the Pennant Builder punch over and center the heart designs.  Cut two for the turrets and one for the card front.

7. Cut flags for the turrets with the Bitty Banners Framelits.

Optional step:   I typed the sentiment "Have a royally good day" (instead of "Have a really good day") and die cut it with the Apothecary Labels Framelits.  I also added a little heart punch.

8.  Remove the Dress Form Pop 'n Cuts die from the Card Base die and diecut a Real Red card base.  Adhere the base to completed pop-up.

9.  Decorate the card front as shown using the More Amore Designer Series paper,  Dress Up Framelit and All Dressed Up stamp set for the sentiment.
I have some other ideas of modifications for these dies which I hope to make in the near future too!