Friday, April 27, 2012

Retiring Stamps Blog Hop


Welcome to Stampin' Addicts Retiring Stamps Blog Hop.  Many wonderful stamps are retiring the end of May and we are showcasing some of our favorites.  I chose the set Nature's Nest.  The intricate details are well suited to a variety of techniques.

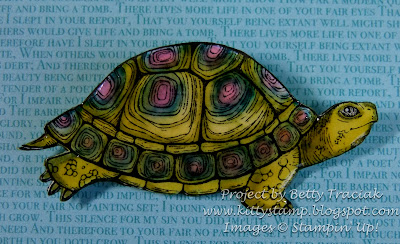
My first project is a turtle pin.  Seeing it in person it is hard to believe it made of paper.  It looks like it belongs in an art boutique!
To make this I stamped the image three times on Shimmery White cardstock and used re-inkers to watercolor one of them.  I layered them on top of each other with Mod-Podge and while it was still wet shaped the turtle into a life-like pose.    Finally I covered it with Crystal Effects and added a pin back.

The gift box is made with the retiring Matchbox Big Shot die.  For the seashell I stamped the image on vellum cardstock,  lightly washed it with three colors of reinkers and coated it with Crystal Effects.  While it was still wet I sprinkled on a light dusting of blue SuperNova Glitter (also retiring).  The grass is green SuperNova glitter too.   (You can click on the photo to make it larger to see the details.)
Next are dragonfly window decorations.  These remind me of the oodles of homeschool projects we did when the kids were younger; we always decorated the house with art work related to what we were studying.   

I have these on the windows of my craft room and they look so life-like.   Again I used staz-on ink  stamped on vellum cardstock and colored them with markers.  Markers blend beautifully on the vellum.  
Lastly I used the feather stamp for a clean and simple card.    I applied Sticky Strip vertically on the card front and sprinkled it with more blue SuperNova glitter.   Glitter also accents the circles on the feather.  A glimmer brad and punches mimicking the feather finish it off.
Thank you for stopping by and now it is time to hop along to the next blog.  You may go forward or backward as we are all linked in a circle.

Click on the Previous button to see Kim's lovely Upsy Daisy projects.
or click on the Next button to go to Krystal's terrific Extreme Elements projects.
Happy Hopping!

Thursday, April 26, 2012

Amazing Hybrid Cards

These cards are a-maze-ing!
The bases are done on My Digital Studio and printed through Stampin' Up's professional print service.   Then I just added the plastic Maze Game embellishment (from the Occasions Mini catalog), two extra circles of DSP and a small piece of ribbon.  
Once I had this designed on MDS it was super quick to change the colors for a second card.  For both cards I used the color scheme from Designer Series Paper packs so the hybrid pieces are a perfect color match.  
To make these cards.  
1. Start with a 5 X 7 blank landscape card.
2.  Add circle punches of various sizes.  The circle where the maze will be should be 2-1/2".
3.  Fill in the circles with colors that match your chosen DSP.
4.  Add a text box and type a sentiment.
5.  Change colors for another card.
6. To make a coordinated writing area on the inside of the cards, insert a duplicate page,  use the mirror image button to flip it and then reduce the opacity.
7.  Once the card is printed, punch a 2-1/2" circle of cardstock to fit in the maze so the colors match the card.   Apply Sticky Strip to the back.   Tuck a piece of folded ribbon behind before adhering it to the card front. 
8.  Punch two circles of coordinating DSP.   Use Stampin' Dimensionals to adhere to the card front.

Tuesday, April 24, 2012

Attic Boutique Side Note Pop up Cards

The Attic Boutique Side Notes from the Occasions Mini catalog are the basis for this set of pop up cards.   These pretty die cuts make this a quick yet elegant grouping.   
This was my last design project for the Cards with Cool Moves session. The live portion has now ended but you can still sign up so you have access to all the tutorials.    Details can be found HERE!

Sunday, April 15, 2012

Petite Pocket Pop Up

My third project for UStamp's Cards with Cool Moves has been posted!   
It uses the Petite Pocket Big Shot die for the pop up portion of the main card.  The flowers are from the Blossom Builders Designer Printed Kit.  (I love the pink rhinestones that come with the kit!!)  These cards and envelopes use 1/2 of the kit so you have enough to make two sets.  

For information about how to access the tutorial for this please click on the blinkie.


Saturday, April 14, 2012

Wobbling Wires

This is my second design project for the Card with Cool Moves session of UStamp.
I used the Bright Bright Blossoms stamp set as the inspiration for these cards.  Each one incorporates wire-- the butterfly and caterpillar head wobble when touched and the flowers are suspended on wire stems.  The new Summer Smooches DSP is so bright and cheerful!

Please click HERE to learn more about signing up for Cards with Cool Moves.  There are over 40 great tutorials for movement cards.

Thursday, April 5, 2012

Collage MDS Hybrid Cards

One of the great things about digital stamping is that you can make a base card and then add ink and embellishments to change it in many different ways.  I created a digital collage and had it printed multiple times through Stampin' Up's professional print service.   Then I experimented with various techniques.... I must say my art student son was duly impressed by these so I think they were a success.

This is what the card looked like when it arrived from the printer.  

For the card at the top of the page, I sponged on various colors of ink (Cherry Cobbler, Daffodil Delight and Pacific Point), then used the White Gel Pen to highlight different areas.  Next I used Dazzling Details (both clear and Cherry Cobbler) on a few images and covered the Happy Birthday portion with a layer of Crystal Effects.

The next one has brighter colors (Tempting Turquoise, Melon Mambo and Daffodil Delight.)

Next I used more muted colors (Concord Crush, Crumb Cake and Cherry Cobbler).  Areas are highlighted with Gold Lame' Pearlized Accent Ink.  This looks very nice in person but does not show up well in the photo.


This last card has additional stamping done in Cherry Cobbler with Dazzling Details (also in Cherry Cobbler) outlining the Happy Birthday label and around the outer edges.
You can click on the photos to enlarge them to see the details.