Friday, January 31, 2014

Sale-A-Bration 2014 Blog Hop

Welcome to the Stampin' Addicts Sale-A-Bration blog hop!  As you have been hopping along, I am sure you have been oo-ing and ah-ing over the great new products available.  Have you picked a favorite yet?   What?  You can can't choose just one you say?  Well I have a solution!   The One Big Sale-A-Bration Digital Ensemble has ALL the SAB stamp sets, the lovely Sweet Sorbet DSP AND an accessory pack too!  Woo Hoo!!

One of the best features of digital stamping is that you can change the size of the stamps.  Make them tiny or make them HUGE!  In the original See Ya Later stamp, the alligator is smaller than the words.  By cropping the stamp I was able to enlarge one part and make the other part smaller (and change the colors as well!)  This is the 5" X 3-1/2" tri-fold card from SU!'s print service which folds out to almost 15 inches.  A pretty good-sized gator!
You can also "paint" a picture digitally.  Later this week I will have a tutorial to show how I colored the outline flowers from the You're Lovely stamp set on this delicate card.
And if you like the look of embossing but don't have your Big Shot handy you can do that do with this ensemble too!  The light green Pistachio Pudding layer is "embossed" with the Decorative Dots stamp.  (You may need to click on the picture to enlarge it to see it.)  Make sure you don't miss this stamp set that comes with the download!   The other stamp set used here is Petal Parade.  The coloring tool was used to change the colors of the petals.
The above card is a hybrid.  It was printed on two halves of a card which I then cut up and reassembled with dimensionals.  The funky little bow is a bit of frayed Starfruit Stitched Satin Ribbon.

I don't know about you but I sometimes struggle to get my bows to lay right.  Well with a digital bow from the Accessory Cord Pack that is not a problem!  Also on this card I love how the Banner Blast stamps have the negative space for the words.  Layering it over the Sweet Sorbet DSP allows the paper to show through!
One more fun thing with this set...  the stamp can used to make a shaped card.    This would be really cool with an e-cutter but since I don't have one (yet!) I trimmed this one with my paper cutter.
Be sure to stop back later this week.  I will have details of how make each of these projects plus I have a few more variations to share too!  (Once I started with this set I didn't want to stop!)

Now it is time to continue with hop either backwards for more My Digital Studio inspiration from Debra as she shows us the Hooray for Parties Digital Ensemble or forward to Holly's Petal Parade projects.


Blog Hop Order:

1) Tanya (tanya27) -- Petal Parade -- http://tinkerin-in-ink.blogspot.com/
2) Heidi (hlw966) -- Sweet Sorbet DSP
3) Rhonda (rhondag) -- Sweet Sorbet Accessories Pack -- The Stampin' Bunny
4) Tina (tina123) -- Decorative Dots Embossing Folder
5) Sara (lilyinkpad) -- Good as Gold
6) Kim (s1itcher46) -- Banner Blast
7) Holly E. (HollyBeary Creations) -- Banner Punch -- http://www.hollybeary.com/
8) Paula (scrapshappen) -- You're Lovely
9) Twila (tjdstampsalot) -- Twisty Treats
10) Mary (nuhddad) -- Heartfelt 
11) Yapha -- See You Later
12) Debra (WebDeb) -- Hooray for Parties Digital Ensemble 
13) Betty (kittystamp) -- One Big Sale-a-Bration CD
14) Holly K -- Petal Parade

Wednesday, January 29, 2014

My Sweet Potato

A silly card today.  Incredibly simple too!
The little potato is an embellishment from the digital Hooray For Tags download.   The entire card is  just the sweet potato embellishment with a background of paper from the Convention 2013 Designer Kit.  I also put the paper on the inside and back of the card.   Then I had it printed through Stampin' Ups print service.  One of the fastest cards ever!

Tuesday, January 28, 2014

Sweetheart Treat Accordion Folder Tutorial

The cheerful little red and white Sweetheart Treat bags were my starting point for this accordion folder that holds both valentines and treats.  A sweet package for your sweetheart!
When opened the bags fan out.  The largest Banners framilit is just the right size for the valentines and as a base for attaching treats.
TUTORIAL:
1.  Score a 4" X 11" piece of Baked Brown Sugar card stock at 4-1/2" and 9-1/2"
2.  Lay a treat bag on the paper trimmer.  Cut the bag down to 4-1/4" inches.  (Save the top of the bag to decorate a valentine.)  I used four bags for mine but you could use more depending on how many pockets you wish to have.
3.  Adhere the bags together by placing a line of Sticky Strip down the center and stacking them on top of each other.
4.  Adhere the stack of bags to inside the card stock folder as shown.  Use a generous amount of adhesive.


5.  Place another vertical line of Sticky Strip on the front treat bag.  Adhere to the front flap of the card stock folder by closing folder.

6.  Add a 3-1/2" X 4-1/4" piece of Fresh Prints DSP to the front and a 1" X 4" piece to the flap.
7.  Wrap a piece of Baker's Twine (it comes with the Sweetheart Treat Bags) around the folder.  Adhere the striped die cut (also included with the treat bags) on top of the twine to secure it.

8.  Stamp the XO image from the Love You to the Moon stamp set on Real Red.  Die cut with the Hearts A Flutter framelit.

9.  Die cut valentines with largest Banners framelit.  Decorate with leftover treat bag paper, DSP and images from Love You to the Moon set.

Valentines tucked inside:


Side view of completed folder:

Sunday, January 26, 2014

I Love You Monster Banner

Since photograghing large projects is not one of my strengths you are going to have to take my word for it that is banner is super cute. 

It is made with Stampin' Ups precut Monster Hugs valentines.    There are small slots on the monster arms that are designed to be coupled together to hold a small candy treat like this:
I linked nine of them together and added letters cut with the Typeset Alphabet die to spell I LOVE YOU.


On each tummy there is an adhesive strip to hold the candy in place.  I covered these with hearts die cut from Sweet Sorbet Designer Series using the Hearts a Flutter framelits.

Again this is not a great photo but it gives a perspective of the size.

Friday, January 17, 2014

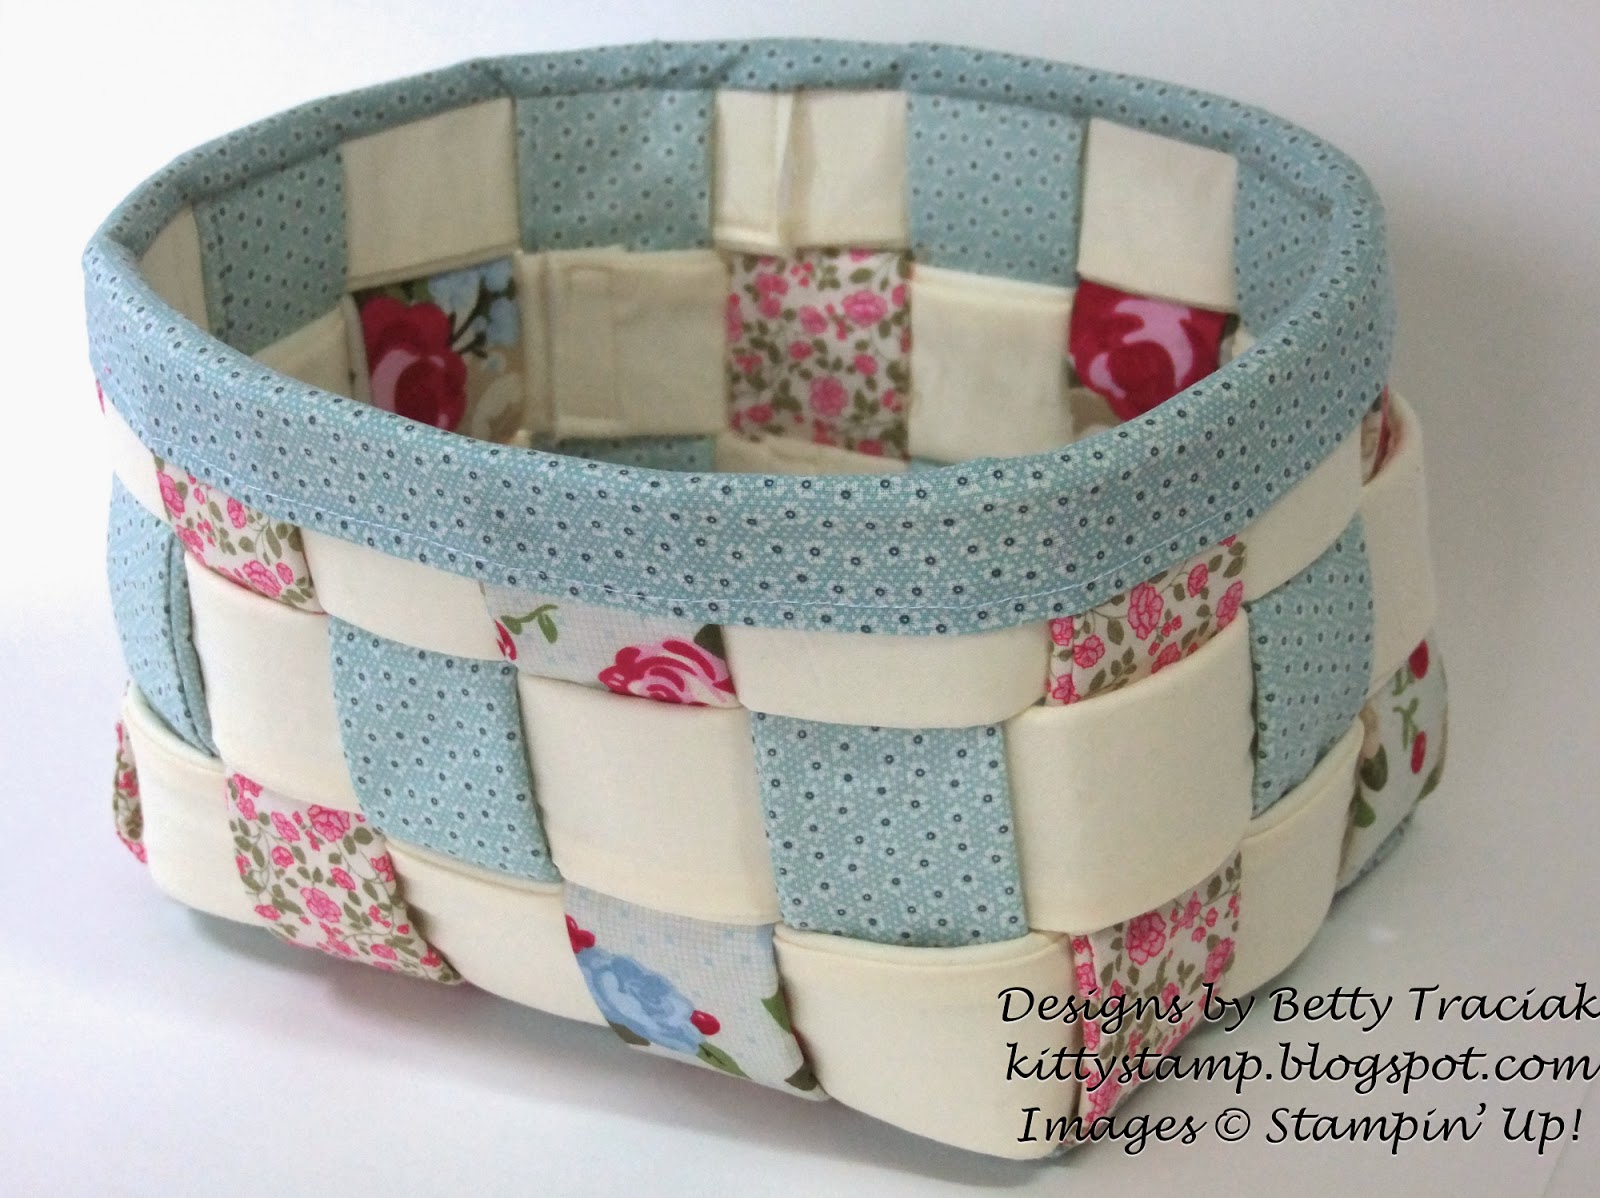
Woven Fabric Basket

My good friend Kathy and I occasionally take a class together at a local quilt shop.  We enjoy talking and catching up as we sew and I at least seldom finish my project in class.    I finally did manage to finish this basket so I could give it as a gift to my sister-in-law.  
It only took a few minutes to put the final touches on.  Not sure why I waited so long!  It is made with the now retired Springtime Vintage fabric and some additional ivory material.  

The pattern is from Aunties Two and is called the Biscuit Basket (#AT-208) and can be seen on this site:  http://www.auntiestwo.com/pattern.html   (Scroll down near the bottom to see the pattern.)  This is a wholesale company so the pattern needs to be purchased elsewhere.   I purchased my pattern at my local quilt shop.  

I did modify the pattern a bit.  The original pattern has a small binding at top.  I made mine a bit wider, sewed a small hem on one side then sewed it on from the inside and folded it over the outside.

Tuesday, January 14, 2014

Perfect Blend My Digital Studio Cards

As a gift for my brother and sister-in-law who own a coffee cafe,  I made a set of cards using My Digital Studio.  

One of the best things about using digital stamps is that you can make them any size.  One big cup is the focal point on the first card.
To color the cup, I added a paint layer on top of the stamp.  I painted over the areas with colors that matched the background paper and then rearranged the layers with the stamp on top again.
The next one has rows of smaller stamps.   To make this I copy and pasted the cup stamp five times then used the "Space Evenly- Horizontal" function to align them.  I added a rectangular punch with a small mat.  Then all I had to do was copy the group, paste it two more times and change the color of the rectangle.
For the next card, I used a rectangle punch again to create a pattern and then filled the punches various DSP patterns.
I had these professionally printed through Stampin' Up's print service.   I like to add color to the inside and back of the cards (like the one above where you can see the light blue green peeking out) or DSP as in the card below.
I repeated the label embellishment on the inside with a small coffee cup for the writing area.

Supplies (all Stampin' Up downloads)
Main stamp set: Perfect Blend
Card #1:  "Warm Winter Wishes" stamp from Snowy Soiree Ensemble, DSP from 12 Days of Christmas
Card #2:  DSP from 12 Days of Christmas Kit
Card #3: DSP from Muted Notes Kit
Card #4:  DSP and embellishments from Jingle and Joy Kit

Wednesday, January 8, 2014

Petite Petals Tunnel Card

We are in the deep freeze the last few days with sub-zero temperatures and LOTS of snow.   With the bitter cold outside it nice to have some pretty flowers inside!  
This is one of the cards from this weekends Stampin' Addicts blog hop.  (You can still do the hop.  Just click here to start hopping!)   The card base is a really easy-to-do tunnel that folds flat for mailing. I used the Fresh Prints Designer Series Paper pack for the front which comes in 4-1/2" X 6-1/2" sheets.


To make the base card:
1.  Trim off 1/4" inch a Fresh Prints paper to make it 4-1/4" X 6-1/2".  (Or start with a 4-1/4" X 6-1/2" piece of your favorite DSP)
2.  Score 1/2", 1" and 1-1/2" from one end.  Fold with mountain, valley, mountain folds.
3.  Center Circle #5 Framelit (counting from smallest to largest) on the card front and run through the Big Shot.
4.  Using Crumb Cake cardstock, make the back just like the front omitting the circle cutout.
5.  Apply adhesive to the end sections and adhere the two pieces together.  

Supplies:
    Stamps: Petite Petals, Starburst Sayings
    Papers: Fresh Prints DSP stack, Crumb Cake, Whisper White and Island Indigo cardstock
    Ink: Basic Gray, Crisp Cantaloupe
    Re-inkers: Indigo Island, Costal Cabana, Crisp Cantaloupe
    Punches: Petite Petals
    Big Shot: Circle Collection Framelits, Starburst Framelits
    Tools: Simply Score Board

Friday, January 3, 2014

SA Occasions Catalog Blog Hop - Petite Petals

HAPPY NEW YEAR and HAPPY NEW CATALOG!  The new Stampin' Up Occasions Catalog launches TODAY and demonstrators at Stampon' Addicts have a blog hop prepared that is chock full of NEW products. As demonstrators we have the opportunity to pre-order products so we are able to show you projects and ideas right away!

The new catalog has a number of cost-saving bundles.  One of them is the Petite Petals bundle which includes the Petite Petals stamp set and coordinating punch and I love it!  I feel like I only scratched the surface of things to do with this!   

First I tried my hand with just the punch and came up with a clean-and-simple card that uses negative punch-outs.
The top layer is punched and then popped-up to distance the background DSP swatches from the punch-out windows.  The DSP is the pretty new Fresh Prints pack and the "love you so" sentiment is from the Geometrical stamp set.  I added a few rhinestones and strips of ribbon to finish it off.

Next I used the punch plus the stamp set to embellish this box.
The top is scoreed with a diagonal grid (quick and easy with the Diagonal Score Board!)  I stamped the images tone-on-tone and punched them out.  These I layered on a non-stamped punch out and added Large Rhinestones. 
 For the last card, I stamped and watercolored the flower images with re-inkers before punching.
This is a simple tunnel card that folds flat in a standard sized envelope for mailing.   I will have the directions for this later next week.  

Now it is time to hop along either forward or backward to see more new products and projects from our talented demos!   

If you hop to the PREVIOUS blog you will see Holly's sweet Simple Stems projects or to the NEXT blog to see Twila's terrific Starburst Sayings Bundle projects.


Wednesday, January 1, 2014

Wrapping Up the Holidays 2013 Projects

Here are two more projects from Wrapping Up the Holidays 2013.   

The first is a hanging pocket holder for mini valentine messages.   It uses the adorable precut Monster Hugs valentines.  I dressed the little guys up with stamped images from the Ronald McDonald charity stamp set Tag It.  And the pockets are made with the new Banner Framelits from the 2014 Occasions Catalog which starts in just TWO DAYS!
The last project is one that posted a little bit ago but I have not had the chance to put it here on my blog.   It is a collection of six gift boxes using the Pop & Place Holiday Gift Tags Book and coordinating Christmas Tagables stamp set.
Both tutorials are available on the Wrapping Up the Holidays 2013 site.