Sunday, December 18, 2016

Stamp Review Crew: Sweet Stack Edition

With the cold, snowy weather here in Michigan I am enjoying all things warm and comfy... fire in the fireplace, hot cocoa and warm snuggly kittens (yes we have a new one!)  

In my quest for warm and cozy I thought a set of quilt cards would be in order and I chose the tiny stamp with the sweet sentiment "Love You to Pieces" from our featured set Sweet Stack.

I adapted a stack-and-cut quilting technique for use with paper.  This makes a set of five coordinating cards so it is a great stash builder or a wonderful gift set.  Stack five pieces of designer series paper together and cut through the entire stack four times.  Then shuffle the papers and "viola!" five cards are almost done! 
Once the quilt pieces are assembled add some hand stitching and pretty little embellishments such as the Sending Love wooden hearts, Lace Doilies and tiny Sprinkles Embellishments.

Please see my video below for the detailed how-to's.  These are really delightful to make!


Well this wraps up the last Stamp Review Crew blog hop of 2016!  BTW we have a great website with all the past blog hops archived.  We already have a jump on planning for 2017 as well so come on back in the new year for more inspiration from the SRC!

Now to continue with the hop please click on one of the buttons below.  Sue and Twila projects are super!!


This way to Twila's Blog


This way to Sue's Blog


Supplies:
Stamps:  Sweet Stack
Paper: Rich Razzleberry and Very Vanilla cardstock,  Falling in Love Designer Series Paper
Ink: Rick Razzleberry
Accessories: Rich Razzleberry Stamp-n-Write Marker, Lace Doilies, Sprinkles Embellishments, Sending Love Embellishments

Friday, December 9, 2016

Snappy Shaker Card

My brother-in-law always has his camera handy for capturing family memories.  So I made him a birthday shaker card with the great retro style camera from the Pun Intended host stamp set.
One of the niftiest yet inconspicuous items in the main catalog are the Foam Adhesive strips.  They are thicker height-wise than Stampin' Dimensionals and just right for shaker and spinner cards.  
 
Of course this special card needed to be pretty flashy! Glitter Paper stars, metallic thread and Mica Flakes did the trick.
Supplies:
Stamps:  Pun Intended
Paper: Mint Macaron and Whisper White cardstock,  Blooms and Bliss Designer Series Paper
Ink: Dapper Denim 
Big Shot:  Layering Squares Framelits
Punches: Classic Label
Accessories: Window Sheets, Adhesive Foam Strips,  Gold Glitter Paper, Mica Flakes Trio Pack, Gold Metallic Thread

Thursday, October 27, 2016

Halloween Scenes Candy Labels

Time for a Halloween party!    
Leah made the caramels (scary how good these are!) and I made the labels.  No stamping just silhouettes cut with the Halloween Scenes Edgelits and bits of Designer Series Paper for accents.  There are circles of the DSP on the plates too to add a fun tie in.

Supplies:
Paper: Pumpkin Pie, Daffodil Delight, Basic Black and Whisper White cardstock,  Halloween Night Speciality Designer Series Paper
Big Shot:  Halloween Scenes Edgelits,  


Saturday, October 22, 2016

Perpetual Easel Calendar Tutorial

The fall holiday tutorial and challenge event on Splitcoaststampers will be wrapping up soon!  There is still time to play along.  My tutorial is posting today and is the last one of the event.   There are nine more so be sure to check them out!

My tutorial is for a perpetual calendar with flip numbers.  This would be a nice gift for someone special and it can be folded flat for mailing.  Just flip the bottom flap backwards.
The date on this one is our wedding anniversary!
Thirty one years with my amazing guy!!
You can make a more stepped-up version by adding to the basic design.  Some ideas are using die cuts to stamp on,  sponging two colors of ink on the numbers and stamping around the numbers.
If you make one be sure to post it in the Splitcoaststampers gallery!  
  • SUPPLIES:
    Stamps:  Number of Years, Basket of Wishes
    Paper: Night of Navy and Whisper White Cardstock,  Floral Boutique Designer Series Paper, Blooms and Bliss Designer Series Paper 
    Ink:  Night of Navy and Mint Macaron Classic Ink
    Punches:  1/16" Circle Handheld
    Big Shot:   Lots of Tags Framelits
    Accessories: 15 mm jump rings, Stampin' Dimemsionala, Floral Boutique Washi Tape
    Tools: Score Board, ruler, pencil, MISTI (optional)

Tuesday, October 18, 2016

Falliday Fest at Splitcoaststampers

Splitcoaststampers is having a fun fall stamping event right now.  Daily challenges and extra tutorials.  I had the fun "job" of creating one of the upcoming tutorials!

This is a card I made for one of the challenges:
The challenge was to use vibrant fall colors and include text on the card.

I created a collage of Halloween text and also added an itty bitty tag of text DSP as an accent.
The words (and the little bat) are from the Spooky Fun stamp set except for the "BOO".   That I borrowed from a retired set to give a bit of contrast in the text styles.

You can click on the banner below to join the Falliday Fest fun.  And later this week I will have details of my upcoming tutorial!


Pumpkin Card:
SUPPLIES:
Stamps:  Jar of Haunts, Spooky Fun, Happy Scenes (retired)
Paper: Whisper White, Daffodil Delight, Pumpkin Pie and Cajun Craze Cardstock,  Halloween Night Speciality Designer Series Paper, scrap of First Edition Speciality Designer Series Paper (retired) 
Ink:  Basic Black Archival
Punches:  1-1/4" Circle
Big Shot:  Layered Circles Framelits, Lots of Tags Framelits
Accessories:  3/8" Ribbon Silky Taffeta Combo Pack, Basic Black Metallic Thread,  Prismacolor Pencils

Friday, October 7, 2016

Stampin' Addicts 2016 Winter Holiday Blog Hop

Welcome to the Winter Holiday Blog Hop presented by the Stampin' Addicts!  Though it is hard to believe it is time to get a jump on crafting those cold weather projects.  It is only 78 days until Christmas!

Our daughter was particularly excited about the Yummy Little Christmas stamp set as she is a prolific baker and confection maker.   She makes more than we can (reasonably) eat so she shares goodies frequently with friends.  I created a trio of gift packages that will be perfect for some of her delicious treats.
These holders are the same style box with variations at the top of each.    I purposely kept the decorations and stamping simple so I can make more and have them on hand.  
Flap of DSP added that is cut with the Lots of Labels Framelits
Trimmed so that a flap remains at the top to fold over
Top is folded down to reveal the pretty double sided paper
Thanks for dropping in today!  Please click on the buttons below to hop on more Stampin' Addict creations!
This way to Rhonda's blog!

This way to Tanya's blog!

Supplies:
Stamps:  Yummy Little Christmas
Paper: Cherry Cobbler, Emerald Envy and Whisper White cardstock,  Presents and Pinecones Designer Series Paper
Ink: Cherry Cobble, Mint Macaron, Emerald Envy
Big Shot:  Lots of Labels Framelits,  Layering Circles Framelits
Accessories: 3/8" Silky Taffeta Ribbon Combo Pack, Metallic Thread Combo Pack


Sunday, October 2, 2016

Stamp Review Crew: Jar of Haunts Edition

Welcome to the Jar of Haunts Blog Hop presented by the Stamp Review Crew.  We have a short and sweet hop this session.  You can hop through in no time!

I love to quilt and these days I just do not have time for a big project.  So I am channeling my quilting vibes with this Dresden Plate-like project.
The Halloween Night Speciality Designer has petite patterns similar to a coordinated line of quilt fabrics- perfect for this!  The wedges are cut using the Home Sweet Home thinlits.  I mounted the black ones in a circle first and then layered the others on top.
I thought the black ink on the pumpkin looked like appliqué stitching and the scalloped edge like rickrack.

Thanks for joining us for our haunting hop!  Please click on the buttons below to see more ideas for this super set!


This way to Holly's blog!


This way to Wendy's blog!

Sunday, September 25, 2016

Stamp Review Crew: Hostess Set Edition

Welcome!  The Stamp Review Crew has organized a bonus Blog Hop featuring the host stamp sets that available in the main catalog and in the holiday catalog.  These sets are AWESOME!  A great variety of styles to choose from.
The stamp set I am using is called Love You Lots and I have to say I love it a lot!  

Taking advantage of the sweet line art in this set I made a magic card.  It looks rather plain until...


the tab is pulled and the magic happens!
I stamped the "you" on the undermost layer along with the flowers.  What a fun card technique!
My next card is one that I posted a little while ago to go along with a larger tutorial on making various types of spinner cards.  (You can see the tutorial HERE.)
This one is a triple spinner and uses punches instead of framelits.  Lots of love for someone special with this card!

Thanks a lot for stopping by and the crew would love to show you more of these wonderful host sets.  Please click on the buttons below to hop along!


This way to Kelly's cute creations!


This way to Holly's fun project!


Magic card:
SUPPLIES:
Stamps:  Love You Lots, Crazy About You
Paper:  Crumb Cake and Whisper White cardstock
Ink:  Staz-On-Jet Black,  Classic Ink- Emerald Envy,  Soft Sky, Soft Suede and Melon Mambo
Accessories:  Window Sheets, 5/8" Burlap Ribbon
Punches:  1-3/8" Circle

Triple Spinner card:
SUPPLIES:
Stamps:  Love You Lots 
Paper: Basic Black, Melon Mambo, Pumpkin Pie and Tempting Turquoise Cardstock,  Festive Birthday Designer Series Paper,
Ink:  Basic Black Archival, Melon Mambo and Pink Pirouette Stampin' Write Markers
Punches:  1-1/4" and 2" Circle,  7/8" Scalloped Circle (retired)
Big Shot:  Baker's Box Thinlit (the heart)
Accessories:  Adhesive Strips, 1/4" Adhesive Dots (Non- SU), Brights Enamel Shapes, pennies

Sunday, September 18, 2016

Stamp Review Crew: Timeless Textures Edition


Ready for a hop around the world?  The "Crew" is a group of international SU! demonstrators who have collaborated to showcase a chosen stamp set for each blog hop.  It is always a delight to see what everyone has created.  So many different ideas for one stamp set!

The Timeless Textures set is one I often use in conjunction with other stamp sets- usually as a subtle background texture.  This time I wanted to move it to the foreground as the main attraction on this wedding card.
The main panel has a Night of Navy flourish and touches of copper heat embossing on the grid and splatters.  To add even more pizzazz I flicked tiny drops of gold Wink of Stella over the top section.  (I masked the bottom portion to keep it splatter-free.)
The right side is super elegant with lots of copper elements.  The Copper Embossing Powder looks amazing on the Copper Foil!  It is a perfect color match.  And the Copper Thread adds a very trendy accent (if I do say so myself!)
This one was a bit difficult to photograph with all the shiny parts!  Up close and personal it is very pretty.

Now it is time to hop along for more timeless and textured projects!


This way to Bruno's project!


This way to Charlene's creation!


SUPPLIES:
Stamps:  Timeless Textures, Balloon Celebration
Paper: Thick Whisper White, Night of Navy
Ink:  Night of Navy, Versamark
Big Shot:  Gift Card Envelope and Trims Thinlit (for the heart)
Accessories:  Copper Foil, Copper Embossing Powder, Copper Thread, Gold Wink of Stella Glitter Brush Pen

Sunday, September 4, 2016

Stamp Review Crew: Foxy Friends Edition

Welcome to the latest Stamp Review Crew Blog Hop.   The "Crew" is made up of Stampin' Up demonstrators from around the globe.  Our blog hops focus on one stamp set each time.  This time we using the wildly popular Foxy Friends set.

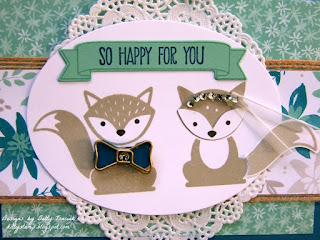
We were invited to a casual country wedding and I thought these little foxes would be perfect as bride and groom.   What an adorable couple!
Touches of burlap keep it country while lace and ribbon add a delicate feel.
I cut thin strips of organza ribbon for her veil and added blue cardstock to his bow tie. 

Thanks so much for hopping with the Crew!  Please click on the buttons below to see more ideas for these Foxy Friends!

This way to Jessica's Blog!
 
Or this way to Nikki's Blog!
  
SUPPLIES
Stamps: Foxy Friends,  Sunshine Sayings and Number of Years 
Paper: Mint Macaron, Dapper Denim and Whisper White Cardstock,  Blooms and Bliss Designer Series Paper
Ink:  Soft Suede, Mint Macaron, Dapper Denim and Basic Black Ink
Big Shot: Layering Oval Framelits, Large Numbers Framelits
Accessories: 5/8" Burlap Ribbon, 5/8" Whisper White Organza Ribbon, Basis Rhinestones, Bow Tie Paper Clips, Delicate White Doilies

Friday, September 2, 2016

Stampin' Addicts Fall Holiday Blog Hop


Welcome to our SA Fall Holiday Blog Hop!  We are a group of Stampin' Up demonstrators who are definitely addicted to stampin' and we want to share that addiction with you!  This time we are focusing on Fall themed products from the brand new Holiday Catalog.   We are showing just a sampling of the new products so our hop is short and sweet.

And speaking of sweet...my chosen stamp set is called Sweet Home.  It has coordinating thinlits to make adorable houses with sweet little decorations.  I decided to make something a bit more scary for this hop though.  I made a few simple modifications to the house diecut to create some mini Halloween treat holders shaped like coffins.

These are great fun to decorate with the tiny stamps and diecuts from the set.  Little bits of DSP and trims go a long way on these mini holders.


They hold small treats such as a tootsie roll or a mini candy bar.
I made a video to show how to modify the die cut to make these.  It also has details of the decorations.

Thanks for hoppin' with the "addicts"!  Click on the buttons below to see more new fall products and great ideas!!


This way to Tanya's terrific projects


This way to Sara's spooky projects