Sunday, January 13, 2013

Oh Hello

Leah crocheted a sweet star-shaped baby blanket as a gift for our neighbor.  She was working quickly to get it done before the baby arrived and she finished it a few days ago.  Perfect timing as little Abigail arrived today!   

Using the star theme, I made a card to go with it.
First I used My Digital Studio to print the baby's name so the color of ink would match the cardstock.  Then I stamped the "Oh, Hello" with Versamark ink and heat embossed it with Melon Mambo powder.    The new Ovals Collection Framelits made it easy to get the image in just the right place.

The blanket is so bright and cheerful!
Soft and warm for a little one!
Supplies for the card:  My Digital Studio, Oh Hello stamp set, Melon Mambo Embossing Powder, Ovals Collection Framelits, Chevron Embossing Folder, Merry Minis Punch Pack, Cardstock: Whisper White, Island Indigo, Daffodil Delight, Melon Mambo, Pretty in Pink, Burmuda Bay (retired).

Wednesday, January 2, 2013

Pop 'n Cuts Castle Card Tutorial

I was so happy to see the Pop 'n Cuts dies designed by Karen Burniston in the Spring Stampin' Up Catalog.  The intended dress theme is just adorable.  (You can see a card I made using them without modification HERE.)  But in addition, when I get a new Big Shot die I try to think of different ways of using them.   

I used the pop-up portion to make this castle card for the Stampin' Addicts Blog Hop.    ( If you have not had a chance to do the hop, click on the above link to see some AWESOME projects with products from the new Spring Catalog.)
Here is how I made it!

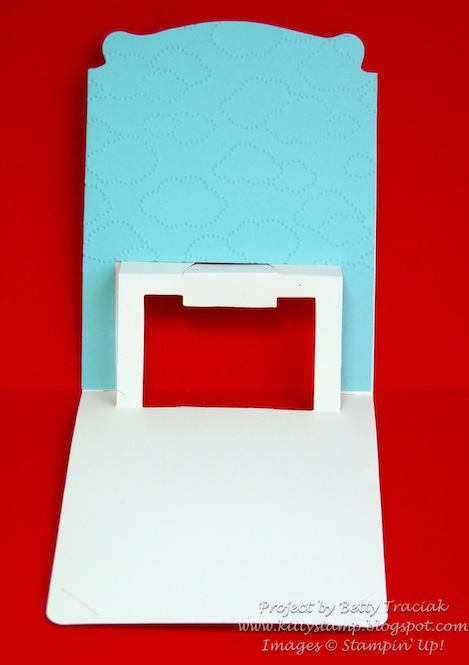
1.  Place the Dress Form Pop 'n Cuts die into the Card Base Pop 'n Cuts.  Diecut with Very Vanilla cardstock.  Trim away the top and bottom of the dress form as shown.
2.  Fold on the scorelines.   Also fold the remaining portion of the dress form down and on the backside tape across the cut to hold it in place.
3.  Cover the upper half of the Card Base Pop 'n Cuts die with Pool Party cardstock.  Run through the Big Shot.  Using the Paper Trimmer, remove a 1-7/8" X 3-1/4" section from the bottom of the piece.  Emboss the top portion with the Cloudy Day Embossing Folder.  Adhere to the Vanilla base.


3.  Cut a 3 X 3-1/2" piece of More Amore DSP.  Use the Paper Trimmer to remove a 3/4" x 2" section from the top center.  Using the smallest Ovals Collection Framelit, cut an archway.  Reserve the cutout portion for later.

4.  Hand cut a curved driveway from Basic Gray cardstock.  Flip the reserved archway portion over and adhere to the driveway.
5.  Adhere the castle to the pop-up portion of the base.
6.  Turn the Pennant Builder punch over and center the heart designs.  Cut two for the turrets and one for the card front.

7. Cut flags for the turrets with the Bitty Banners Framelits.

Optional step:   I typed the sentiment "Have a royally good day" (instead of "Have a really good day") and die cut it with the Apothecary Labels Framelits.  I also added a little heart punch.

8.  Remove the Dress Form Pop 'n Cuts die from the Card Base die and diecut a Real Red card base.  Adhere the base to completed pop-up.

9.  Decorate the card front as shown using the More Amore Designer Series paper,  Dress Up Framelit and All Dressed Up stamp set for the sentiment.
I have some other ideas of modifications for these dies which I hope to make in the near future too!

Monday, December 31, 2012

Card Base Pop 'n Cuts Purse

Both today and tomorrow I will be sharing the details of the All Dressed Up Bundle projects from this weekend's Stampin' Addicts Spring Catalog 2013 Blog Hop.  

I used just the Card Base Pop 'n Cuts die without the insert to make this little very simple (and quick!) purse.  
1.  Die cut a card base from Designer Series Paper.
2.  Lay it vertically on the Simply Scored board and score at 5 inches and 6 inches.  Fold on scorelines.
3.  Punch a hole with the Itty Bitty Circle Punch in the two corners of the front.
4.  Thread Pool Party Ruffled Ribbon through the front hole, the two back slits and through the remaining front hole.
5. Tie a bow in the ribbon.
6.  On the inside you can attach a cello bag or, as I did, use Sticky Strip to attach chocolates and a greeting.  I also added a flower snipped from the 5/8" Ribbon Trim.
7.  For the outside, stamp the dress in Pool Party on Very Vanilla cardstock and die cut with the Dress Up Framelit.  Also diecut the dress form from Very Vanilla.
 8.  Add two roses in the bottom corners to complete.

Tomorrow I will have the tutorial for the castle pop-up card.  See you then!

Thursday, December 20, 2012

Chocolate Santa Hat

While shopping this week I found a big Hershey Kiss wrapped like a Santa hat.   I thought it would be a fun challenge to make a Santa box to fit the hat:

The Santa head is made from two petal cone diecuts that are scored and cut off as shown then adhered together.  Three rounded flaps are tucked inside and the remainder has a white half scalloped circle (also cut with the petal cone die) adhered to it for his beard.

I used the Itty Bitty Circle Punch for his nose and mouth, the Bird Builder Punch for his mustache and the 1/4' Circle Punch for his eyes.

The body is made from four petite pocket diecuts that have the longer flaps cut down to two inches.    All four are adhered side by side then joined into a box.
The box portion holds a generous amount of regular size Hershey Kisses so this is a super chocolate lovers gift!
FYI:  Here is what the Santa hat packaging looks like if you are shopping for one.

Tuesday, December 18, 2012

Money Holder Tutorial

A simple project and tutorial today that can be used for many occasions:  a decorated money holder.
I made this one using the Merry Moments Simply Scrappin" Kit. Designer Series Paper is nice for this project because it has designs on two sides making the inside just as pretty as the outside.

To make the money holder: 
1.  Cut Designer Series Paper 7" X 8-1/2".
2.  Score the 8-1/2" side at 1-1/2" and 5"

3.  Fold on the score lines.  Round the top corners with the 3/16" Corner Punch. On the inside,  place Sticky Strip on the bottom section near the edges.

4.  Adhere the bottom flap up to create a pocket.
5.  Decorate the flap with diecuts from the Simply Scrappin' Kit.  Cut a 1" X 9-1/2" strip of cardstock and fold around the holder to make a belly band.  Add a diecut strip to the belly band.

These work well with Designer Series Paper with large designs as well.  Here are several holders that I made two years ago where I placed the designs in the corner or at the sides.

Saturday, December 15, 2012

Hanukkah Kisses Box

Leah was invited to her friend's house tonight for festivities for the last night of Hanukkah.  We made a card and small hostess gift for her to take.
Though it does not show in the photo, this is stamped on Shimmery White paper so it has a soft sparkle that really dresses it up.  The sentiment is stamped with the Illuminate Glimmer Watermark ink so it sparkles too.
The box is made with two 8" X 8" pieces of Midnight Muse cardstock. The bottom is scored 2 inches from each side then cut and assembled.
The top is also scored 2 inches from each side but with a homemade shim in place to make it the perfect size.  The shim bumps the paper over just a tad. If you have not seen Connie Stewart's video on making a shim to fit your score board you can check it out HERE.

The stamping on the sides is easiest to do while the box top is flat.  I scored it first then used the scorelines to help with the placement of the sentiment.  Clear mounted stamps really come in handy making it easy to get them straight!

Friday, December 14, 2012

Divided Fancy Favor Boxes

It is time to wrap up the Wrap the Holidays session of UStamp.  My final project is this set of divided boxes.
It uses very minimal supplies making it perfect for a class.  One Simply Scrappin' Kit, the Fancy Favor Big Shot die and some Sticky Strip are all you need.  Two, three or four Fancy Favor boxes are combined to make the dividers.  

Because the Fancy Favor Box requires 12 x 12 paper, the Simply Scrappin' Kits are great for this.  Also any Simply Scrappin' Kit will work so it could be be made in many different themes.  The complete tutorial is available on the Wrapping Up the Holidays site.