I was wondering why everyone was so excited that Stampin' Up will be carrying Memento Tuxedo Black Ink in the upcoming catalog. Now I know! It stamps a beautiful clean crisp image. The color is true black on both dark and light cardstock. And because it is water-base it does not smear when using the Blendabilites which are alcohol-base markers.
The intricate details of the stamp show up and stay just perfectly when colored over with the markers. These flowers have all three shades of the Coastal Cabana markers. Even with the darkest shade of marker the black ink still shows through a deep rich black.
Supplies:
Stamps: Flower Shop, My Mother
Ink: Memento Tuxedo Black, Coastal Cabana Blendabilities
Paper: Whisper White, Indigo Island, Watercolor Wonder Designer Series Paper
Punches: Pansy
Big Shot: Deco Labels Framelits
Accessories: Basic Rhinestones, Soft Sky Seam Binding
Saturday, May 10, 2014
Friday, May 9, 2014
More Hamburger Box Critters
Thanks everyone who commented on Stampin' Connection and Splitcoast Stampers where I posted yesterdays Hamburger Box Critters or here on my blog. These are really so fun to make. I tell ya they are addicting. The more I make the more ideas pop in my head! I started a list of possible ideas and it just keeps growing.
These are the three I make today:
This guy doesn't look very crabby, in fact he looks pretty darn pleased to be here!
But Mr Zebra has a bit of an attitude sticking out his tongue!
And the sweet little Giraffe looks a bit concerned by all the commotion.
The personalities emerge as I create them-- it is often a surprise as I keep changing my mind as I go!
Most of the shapes are pretty self explanatory but there a few little tricks for each animal.
Crab:
For the pincers, punch the Extra Large Oval piece first. Then use the tip of Triangle Punch to take a little bite out of it.
Zebra:
The nostrils are the leaves on the branch of the Bird Builder punch. Trim off the single leaf at the end of the branch.
Giraffe:
I thought this idea was pretty cool! The head knobs and ears are diecut with the safety pin framelit from the new Baby's First Steps collection (available June 1). Cut two yellow and two brown pieces. Cut the brown pieces in two and glue the tip on the yellow diecut.
The bottom brown piece becomes the inside of the ear. The outer ear is trimmed from the largest Floral Frames framelit.
Also: A tip for adhering the little "pleats" at the corners. A really strong adhesive is required. I was having a bit of trouble yesterday with the corners staying stuck together but today I had much better luck by trimming the Sticky Strip at an angle. It really didn't take long once I got the pattern down.
As time allows I will post more critters! Thanks for stopping by and I really do appreciate those who take time comment!
Crab Punches:
Eyes: 1-3/8" Circle (cut in half), 1-1/4" Circle, 3/4" Circle
Mouth: 1-3/4" Circle
Legs: 2-1/2" Circle
Pinchers: Modern Label, Extra Large Oval, Triangle
These are the three I make today:
This guy doesn't look very crabby, in fact he looks pretty darn pleased to be here!
But Mr Zebra has a bit of an attitude sticking out his tongue!
And the sweet little Giraffe looks a bit concerned by all the commotion.
The personalities emerge as I create them-- it is often a surprise as I keep changing my mind as I go!
Most of the shapes are pretty self explanatory but there a few little tricks for each animal.
Crab:
For the pincers, punch the Extra Large Oval piece first. Then use the tip of Triangle Punch to take a little bite out of it.
Zebra:
The nostrils are the leaves on the branch of the Bird Builder punch. Trim off the single leaf at the end of the branch.
Giraffe:
I thought this idea was pretty cool! The head knobs and ears are diecut with the safety pin framelit from the new Baby's First Steps collection (available June 1). Cut two yellow and two brown pieces. Cut the brown pieces in two and glue the tip on the yellow diecut.
The bottom brown piece becomes the inside of the ear. The outer ear is trimmed from the largest Floral Frames framelit.
![]() |
| Floral Frames diecut trimmed to form the outer ears |
![]() |
| Bottom half of the safety pin layered on the Floral Frames piece. |
Also: A tip for adhering the little "pleats" at the corners. A really strong adhesive is required. I was having a bit of trouble yesterday with the corners staying stuck together but today I had much better luck by trimming the Sticky Strip at an angle. It really didn't take long once I got the pattern down.
As time allows I will post more critters! Thanks for stopping by and I really do appreciate those who take time comment!
Crab Punches:
Eyes: 1-3/8" Circle (cut in half), 1-1/4" Circle, 3/4" Circle
Mouth: 1-3/4" Circle
Legs: 2-1/2" Circle
Pinchers: Modern Label, Extra Large Oval, Triangle
(Cardstock colors: Rose Red, Whisper White, Basic Black)
Zebra Punches:
Eyes: Small Oval, 1/4" Circle
Tongue: Extra Large Oval
Ears: Extra Large Oval, Large Oval
Nose: Extra Large Oval
Nostrils: Bird Builder Punch (clip the end leaf)
(Cardstock: Kaleidoscope DSP, Basic Black, Pink Pirouette, Whisper White, Smoky Slate, Rose Red)
Eyes: Small Oval, 1/4" Circle
Tongue: Extra Large Oval
Ears: Extra Large Oval, Large Oval
Nose: Extra Large Oval
Nostrils: Bird Builder Punch (clip the end leaf)
(Cardstock: Kaleidoscope DSP, Basic Black, Pink Pirouette, Whisper White, Smoky Slate, Rose Red)
Giraffe Punches:
Eyes: Small Oval, 1/8" Handheld
Eyebrows: Bird Builder (piece of the stem of the leave spray)
Ears: Floral Frames Collection Framelit (largest framelit), Baby's First Framelits (safety pin)
Head Knobs: Baby's First Framelits (safety pin)
Nostrils: 3/4" Circle
(Cardstock: So Saffron, Basic Black, Whisper White, Early Espresso)
Eyes: Small Oval, 1/8" Handheld
Eyebrows: Bird Builder (piece of the stem of the leave spray)
Ears: Floral Frames Collection Framelit (largest framelit), Baby's First Framelits (safety pin)
Head Knobs: Baby's First Framelits (safety pin)
Nostrils: 3/4" Circle
(Cardstock: So Saffron, Basic Black, Whisper White, Early Espresso)
Thursday, May 8, 2014
Hamburger Box Critters
It is looking a bit like a zoo in my craft room (and a bit of mess)! No pics of the post-creation craft room whirlwind (believe me you do NOT want to see that!) but I do have cutie pie animal pics.
This menagerie is made with the new Stampin' Up Hamburger Box Bigz XL die.
Mr Alligator was the first critter to join the zoo. Love the teeth on all three sides! They are made with the 1" Square Punch set on an angle.
Then came Mr Horse:
I was going for a monkey but once I had the base assembled I thought the Baked Brown Sugar looked more equine. His teeth are also made with the 1" Square Punch cut in half to form rectangles. The forelock is made with the tail piece of the bird from the Bird Builder Punch.
So I tried again for a monkey with a Chocolate Chip colored Hamburger Box. Guess what? It turned in to a bear!
I think this guy looks like Baloo the Bear from Jungle Book.
And last a hippopotamus joined the crowd:
I have ideas for a few more critters so hopefully tomorrow I can get time to make some more! Playing with the die has given me some ideas for ways to modify the box into other things so keep a look out for those too!
Below is a list of all the punches and framelits for each animal. I think they are pretty easy to figure out from the pictures but let me know if you have any questions!
Alligator Punches:
Eyes: Extra Large Oval, Small Oval and 1/2" Circle
Nostrils: 3/4" Circle
Teeth: 1" Square
Horse Punches:
Eyes: Small Oval, 1/2" Circle
Ears: Extra Large Oval, Large Oval
Forelock: Bird Builder
Nostrils: 1/8" Handheld
Teeth: 1" Square- cut in half
Bear Punches:
Head: Largest smooth Circle Framelit, Third Largest smooth Ovals Framelit
Ears: 1-3/8" Circle, 1" Circle
Eyes: 3/4" Circle, 1/2" Circle
Nose: Small Oval
Hippo Punches:
Eyes: 1-1/2" Circle, 1-1/4" Circle, 3/4" Circle
Nostrils: 3/4" Circle
Teeth: 1" Square- cut in half
This menagerie is made with the new Stampin' Up Hamburger Box Bigz XL die.
Mr Alligator was the first critter to join the zoo. Love the teeth on all three sides! They are made with the 1" Square Punch set on an angle.
Then came Mr Horse:
I was going for a monkey but once I had the base assembled I thought the Baked Brown Sugar looked more equine. His teeth are also made with the 1" Square Punch cut in half to form rectangles. The forelock is made with the tail piece of the bird from the Bird Builder Punch.
So I tried again for a monkey with a Chocolate Chip colored Hamburger Box. Guess what? It turned in to a bear!
I think this guy looks like Baloo the Bear from Jungle Book.
And last a hippopotamus joined the crowd:
I have ideas for a few more critters so hopefully tomorrow I can get time to make some more! Playing with the die has given me some ideas for ways to modify the box into other things so keep a look out for those too!
Below is a list of all the punches and framelits for each animal. I think they are pretty easy to figure out from the pictures but let me know if you have any questions!
Alligator Punches:
Eyes: Extra Large Oval, Small Oval and 1/2" Circle
Nostrils: 3/4" Circle
Teeth: 1" Square
Horse Punches:
Eyes: Small Oval, 1/2" Circle
Ears: Extra Large Oval, Large Oval
Forelock: Bird Builder
Nostrils: 1/8" Handheld
Teeth: 1" Square- cut in half
Bear Punches:
Head: Largest smooth Circle Framelit, Third Largest smooth Ovals Framelit
Ears: 1-3/8" Circle, 1" Circle
Eyes: 3/4" Circle, 1/2" Circle
Nose: Small Oval
Hippo Punches:
Eyes: 1-1/2" Circle, 1-1/4" Circle, 3/4" Circle
Nostrils: 3/4" Circle
Teeth: 1" Square- cut in half
Wednesday, May 7, 2014
Blended Dahlia
My preorder arrived today with new products from the upcoming Stampin' Up catalog. The first thing I chose to experiment with was the new Blendabilities Markers. Are they ever nifty!
The markers come in packs of three with dark, medium and light shades of the same color. That makes shading so easy! I used the Daffodil Delight Assortment on the Regarding Dahlias stamp.
I did discover a few things working with the markers:
1) It is best to work in small sections and blend each little area as the colors are most workable while the ink is still wet.
2) The Color Lifter pen dampens the paper and pushes the ink in front of it. You can get different effects if you go over the area first with Color Lifter and then work on the wet surface. Or you can use the Color Lifter after using the markers to blend the shades together.
3) Some colors are very intense and require a very light touch. This seemed especially true of the Cherry Cobbler markers.
4) Also be sure to protect your work surface as the markers can bleed through to the underside especially as you add more color layers and use the Color Lifter.
I added the faintest touch (a tiny, tiny touch with the tip of the marker!) of red to the center of the flower with the lightest Cherry Cobbler marker then went over it several times with the Color Lifter pen to dilute and blend the color. When blended the color looked more like the Tangerine Tango in the Watercolor Wonder Designer Series Paper that is the background of the card.
The Blendabilites Markers will be available starting June 1.
Supplies:
Stamps: Regarding Dahlias, My Mother
Ink: Memento Tuxedo Black
Cardstock: Basic Gray for the card base, Whisper White for stamping and coloring with Blendabilities, Watercolor Wonder Designer Series Paper
Tools: Blendabilites Mardkers: Daffodil Delight Assortment, Color Lifter
Accessories: Basic Black Chevron Ribbon, Brights Candy Dots
The markers come in packs of three with dark, medium and light shades of the same color. That makes shading so easy! I used the Daffodil Delight Assortment on the Regarding Dahlias stamp.
I did discover a few things working with the markers:
1) It is best to work in small sections and blend each little area as the colors are most workable while the ink is still wet.
2) The Color Lifter pen dampens the paper and pushes the ink in front of it. You can get different effects if you go over the area first with Color Lifter and then work on the wet surface. Or you can use the Color Lifter after using the markers to blend the shades together.
3) Some colors are very intense and require a very light touch. This seemed especially true of the Cherry Cobbler markers.
4) Also be sure to protect your work surface as the markers can bleed through to the underside especially as you add more color layers and use the Color Lifter.
I added the faintest touch (a tiny, tiny touch with the tip of the marker!) of red to the center of the flower with the lightest Cherry Cobbler marker then went over it several times with the Color Lifter pen to dilute and blend the color. When blended the color looked more like the Tangerine Tango in the Watercolor Wonder Designer Series Paper that is the background of the card.
The Blendabilites Markers will be available starting June 1.
Supplies:
Stamps: Regarding Dahlias, My Mother
Ink: Memento Tuxedo Black
Cardstock: Basic Gray for the card base, Whisper White for stamping and coloring with Blendabilities, Watercolor Wonder Designer Series Paper
Tools: Blendabilites Mardkers: Daffodil Delight Assortment, Color Lifter
Accessories: Basic Black Chevron Ribbon, Brights Candy Dots
Saturday, May 3, 2014
Smoky State Watercolor
Stamping on patterned paper can add a unexpected element to a card. For this card I stamped the flowers on the softly dotted Watercolor Wonder DSP then added a touch of ink using a cotton swab.
Supplies:
Stamps: Happy Watercolor
Ink: Smoky Slate, Blushing Bride
Paper: Whisper White, Pink Pirouette, Watercolor Wonder Designer Series Paper, Silver Fancy Foil Designer Vellum
Punches: Bitty Butterfly
Accessories: Silver 1/8" Ribbon, Basic Metal Buttons, Basic Rhinestones
The splotches on the background are stamped with Smoky Slate Classic Ink, the upper one full strength and the lower one stamped off once. Lots of silvery details to finish it out.
This also is my first time joining the Mojo Monday Sketch Challenge.
Stamps: Happy Watercolor
Ink: Smoky Slate, Blushing Bride
Paper: Whisper White, Pink Pirouette, Watercolor Wonder Designer Series Paper, Silver Fancy Foil Designer Vellum
Punches: Bitty Butterfly
Accessories: Silver 1/8" Ribbon, Basic Metal Buttons, Basic Rhinestones
Friday, May 2, 2014
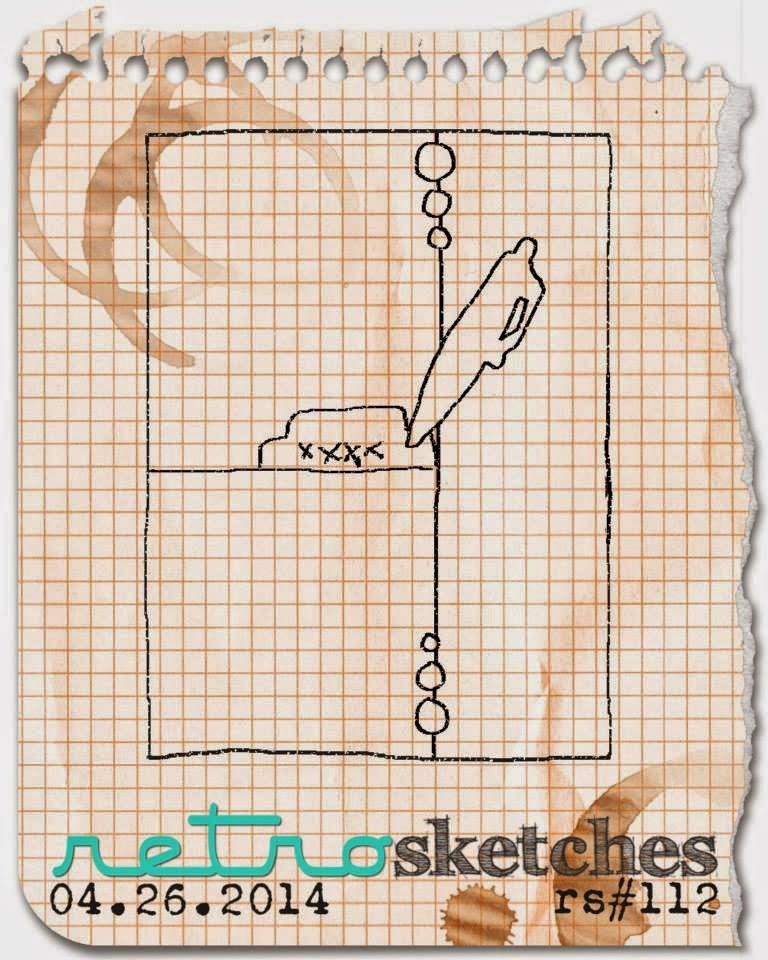
First Retro Sketches Challenge
This is my first time joining the Retro Sketches Challenge. It only seemed appropriate to pick the Retro Fresh DSP to make it!
For the balloon, I stamped the image from the Big Wish set with Versa Mark ink on the patterned paper. That made the balloon show up just enough to cut it out by hand. Then I shaped it slightly and coated it with Crystal Effects to give a nice shiny 3d look.
Here is the sketch I started with:
Supplies:
For the balloon, I stamped the image from the Big Wish set with Versa Mark ink on the patterned paper. That made the balloon show up just enough to cut it out by hand. Then I shaped it slightly and coated it with Crystal Effects to give a nice shiny 3d look.
Here is the sketch I started with:
Supplies:
Stamps: Big Wish
Cardstock: Tangerine Tango, Retro Fresh DSP
Ink: Versamark
Accessories: Coastal Cabana Thick Bake's Twine, Crystal Effects, Brights Candy Dots, Tangerine Tango Embossing Powder
Big Shot: On Film Framelits
Thursday, May 1, 2014
Geometrical Mini Card Set
The very first stamping supplies I ever bought were a pack of Stampin' Up Brights collection markers, a pack of Whisper White paper, a pack of Basic Black paper and a stamp set. The colors in this card set remind of the fun I had discovering stamping! Bold, bright and fun!
These little 3" X 3" cards each have a base of black cardstock dressed up with Kaleidoscope designer series paper and the Geometrical stamp set. The box is made with the Envelope Punch Board.
Little accents make each one cheerful:
These little 3" X 3" cards each have a base of black cardstock dressed up with Kaleidoscope designer series paper and the Geometrical stamp set. The box is made with the Envelope Punch Board.
Little accents make each one cheerful:
![]() |
| Strips of 1/8" Taffeta Ribbon and Brights Candy Dots |
![]() |
| Rhinestones on the sentiment |
![]() |
| Hearts punched with the Owl Builder Punch |
Subscribe to:
Posts (Atom)