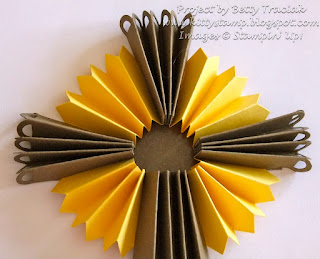
The cross is made much like a regular rosette except that the pieces are cut to varying heights.
Cardstock- Soft Suede, Daffodil Delight, Whisper White, Elegant Eggplant
Stamps- Easter Dove
Big Shot die- Designer Rosette
Punches- Blossom
Accessories- Gold Embossing Powder, Sticky Strip, Sticky Pages
To Make the Cross:
1. Die cut the cross pieces as in the picture below. Each piece is eight scallops wide.
2. Accordion fold each of the pieces. Lay the Soft Suede pieces down with the first fold as a mountain fold. Flip the Daffodil Delight pieces over so the first fold is a valley fold.
3. Using sticky strip, adhere the pieces together alternating the colors making sure the Daffodil pieces are tucked under the Soft Suede pieces.
4. Adhere the ends together to form a circle.
5. Cut two strips of Soft Suede 7/8" X 4" and 7/8" X 6". Cover with Sticky Pages adhesive cut to the same size. Peel the adhesive and adhere to form a cross.
6. Lay the accordion pieces flat on the adhesive-covered cross and shape as in the picture below.
7. This is the back view. After I had it finished I put a book on top of it for a while to make sure the adhesive stuck well. Mine held just fine but a glue gun could be used for an extra firm hold.
8. Punch a flower from Whisper White with Blossom Punch. Heat emboss the image from the Easter Dove stamp with Gold embossing powder and punch with the 1-3/4" Circle punch. Adhere to the center.
The daffodil also uses the Designer Rosette die:
Supplies needed:
Cardstock- Daffodil Delight (of course!), Lucky Limeade
Classic Ink - Pumpkin Pie
Big Shot dies - Designer Rosette, Island Floral, Leaves #2
Punches - 3/4" Circle
Accessories - Simply Scored Board, Paper Piercer, Sticky Strip, Floral wire (non-SU)
To Make the Daffodil:
1. Die cut two flower shapes with the Island Floral die. Curl the petals over a paper piercer.
2. Cut a piece of Daffodil Delight with the Designer Rosette die that is seven scallops long. Trim to a height of 1-3/4". Score 1/4" from the bottom with the Simply Score Tool. Clip on the score lines. Sponge the top edge with Pumpkin Pie ink.
3. Curl the upper edge back.4. Fold on the score lines. Overlap one section and adhere with Sticky Strip. (The Pumpkin Pie sponging is on the inside.)
5. Bend in the small flaps. Adhere a 3/4" Circle to the bottom. I also adhered a second circle inside the flower to give a finished look.
6. Punch a third circle and pierce two holes near the center. Bend a piece of floral wire and insert through the holes.7. Overlap the two flower pieces. (I used mini glue dots to keep them aligned.) Apply adhesive the bottom of the circle and thread the wire through the hole in the center of the two flower pieces. Adhere the flower trumpet to the center.
8. Wrap the wire with ribbon and insert the leaves between the ribbon wrapping. Secure with glue dots.
Tomorrow (hopefully!) I will have the details of making the My Digital Studio recipe page and the Bunny rolls for the Easter Brunch.
If you have found this helpful I would love to receive a comment! Happy Stamping!


Fab! I will be casing! It's nice to see someone include creative thought for a cross! debra
ReplyDeleteThis is so beautiful...I love...love...your cross...awesome idea...new follower here too...tfs
ReplyDeleteAMAZING! Love these Betty!
ReplyDeleteThese are super. I really must have a go at these. Have only just come across your blog. Wonderful work. Thanks for sharing.
ReplyDeleteLove Joan xx
Amazing! Thank you for sharing!
ReplyDeletePatricia Gessner
Found you thru Kim Score. Love both these projects! You did a wonderful job on them! TFS Hugs!!
ReplyDeleteThanks for sharing! The projects r beautiful!
ReplyDeleteGreat ideas, thanks for sharing how you did them.
ReplyDeleteYou always have such great tutorials stepping us through your great ideas! TFS!
ReplyDeleteLove these! I will now be following you- you have such beautiful, creative ideas and your instructions are very detailed and clear!
ReplyDeleteThanks for sharing!!
Love these! I will now be following you- you have such beautiful, creative ideas and your instructions are very detailed and clear!
ReplyDeleteThanks for sharing!!
Fabulous! Super creative… Love it!
ReplyDeleteThanks for sharing instructions for the cross! I'll make several to share with several community people. Blessings!!
ReplyDeletekevin durant shoes
ReplyDeletekyrie spongebob
golden goose outlet
jordan 13
longchamp handbags
golden goose
replica bags turkey gucci fake g0h26k0k57 replica bags philippines replica bags prada visit our website v3g92n6d88 replica bags toronto replica bags in delhi replica hermes bags n8i01p1c45 replica bags uk
ReplyDeletejdfgnhhk958
ReplyDeletesupreme outlet
golden goose outlet
golden goose outlet
golden goose outlet
golden goose outlet
golden goose outlet
golden goose outlet
golden goose outlet
golden goose outlet
golden goose outlet