Sunday, December 3, 2017

Stamp Review Crew: Wood Words Edition

Welcome to the latest Stamp Review Crew Blog Hop!  We feature one stamp on each hop so you can see many different ideas and styles.  One of the wonderful things our founder and amazing coordinator Tanya Boser has done is create a website that archives all our past hops.  A tremendous resource if you are looking for inspiration!  Click on the banner below to visit the site!

Our featured set for this session is the lovely, lovely Wood Words stamp set.  Of all the sets in the main catalog this has been the one that I have used over and over.  I have used it for Mother's Day, bridal shower, wedding, Halloween and now Christmas.  
This card has some pretty embossing on vellum - white for the floral image and gold for the moon and star.  I colored the back of the vellum using Stampin' Blends to get a touch of delicate color and added a few tiny sequins pulled from the Gold Mini Sequin Trim to tie in all the metallic elements.  
Heat emboss the front,  then flip over and color with Stampin' Blends on the back.

I have to say this is was the first stamp set I picked from the annual catalog when it was new and it is still my fav!


It is wonderful that you have chosen to visit today!  Please click on the buttons below to see more ideas beautiful stamp set!


This way to Kelly Kent's creations!


Or this way to Charlet's blog!

Stamps:  Wood Words
Paper:   Year of Cheer Speciality Designer Series Paper, Thick Whisper White cardstock, Vellum cardstock, Silver Foil
Ink:  Versamark ink,  Stampin' Blends, Basic Gray Stampin' Write Marker
Big Shot:  Layering Circles Framelits, Wood Crate Framelits
Accessories:   2017-2019 In-Color Bitty Bows

Friday, November 10, 2017

Presenting the Gifts Blog Hop


Welcome to the the November Inky Friends Blog Hop.  Our theme this month is all about simple and pretty ways of making gift packages.   The Inky Friends have lots of fun ideas to make your gifts extra special!

I used the Gift Bag Punch Board and came up with three different bag variations.   (If you have not used it, Stampin' Up has a nice video explaining the general directions for using it.)

For this bag I wanted to use the Deck the Halls sheet music paper from the Merry Little Christmas pack to go along with the punny sentiment "Paw la la la la la la la la" from the Santa Paws stamp set.  It is so perfect that the music has the Fa la la la section right on the front of the box!
To get the Deck the Halls title in the right spot I had to do I little bit of thinking but it is really easy to recreate.  If you would like to make one see the directions at the bottom of the post.

For the next bag I made it really tall to hold a lot of Christmas goodies. 
TIP:  I used a whole sheet of 12' X 12" paper.  Something this tall is too long to fit on the punch board so I did all the scoring that I could (using the lines for the large size box) as far as I could score.  Then I rotated the paper 180 degrees and lined up the score lines and finished scoring the length of the paper.  

The next bag has an extra flap to hold it shut and add a pretty splash of red.    
I used the new Stampin' Blend Alcohol Markers to color the images.  Oh my,  I LOVE these!  Such vibrant colors and NO lines.  I feel like a real artist using them!    They are super juicy so a light hand is necessary when coloring very detailed images such as these.  I really like the simple effect that coloring around an image with the Light Pool Party marker gives.  I am looking forward to experimenting more with these lovely markers!

Now it is time to hop along to see more beautiful packaging ideas!


Click here to see Sara's sweet Snowflake Sentiments projects!


Click here to see Holly's lovely Labels of Love projects!

Here is to how get the Deck the Halls paper just right:  

1.  Cut the paper in half.   Then trim a 2 inch piece from the side as shown.  Use the bottom left piece to make the gift bag.
2.  Flip the paper upside down with the words oriented as shown.  
3.  Follow the directions for making the small size gift bag.  (Skip the side triangles and side score line for this style bag.)   I added a small border of red DSP at the top of the bag to make it pretty and to cover the little bit of printing just above the title.


Stamps:  Santa Paws
Paper:  Quilted Christmas Designer Series Paper, Merry Little Christmas Designer Series Paper, Merry Music Speciality Designer Series Paper, Whisper White, Real Red, Old Olive and Pool Party cardstock
Ink:  Real Red and Old Olive Classic Ink, Momento Blackl Ink, Stampin' Blends
Big Shot:  Layering Circles Framelits, Layering Ovals Framelits, Stitched Shapes Framelits
Punches: 1-1/4" Circle, 1-3/8" Circle
Accessories:  7/8" Striped Ribbon, Season of Glitz Mini Gift Bows
Tools: Gift Bag Punch Board

Wednesday, October 25, 2017

Stack and Cut Quilt Card Video Tutorial

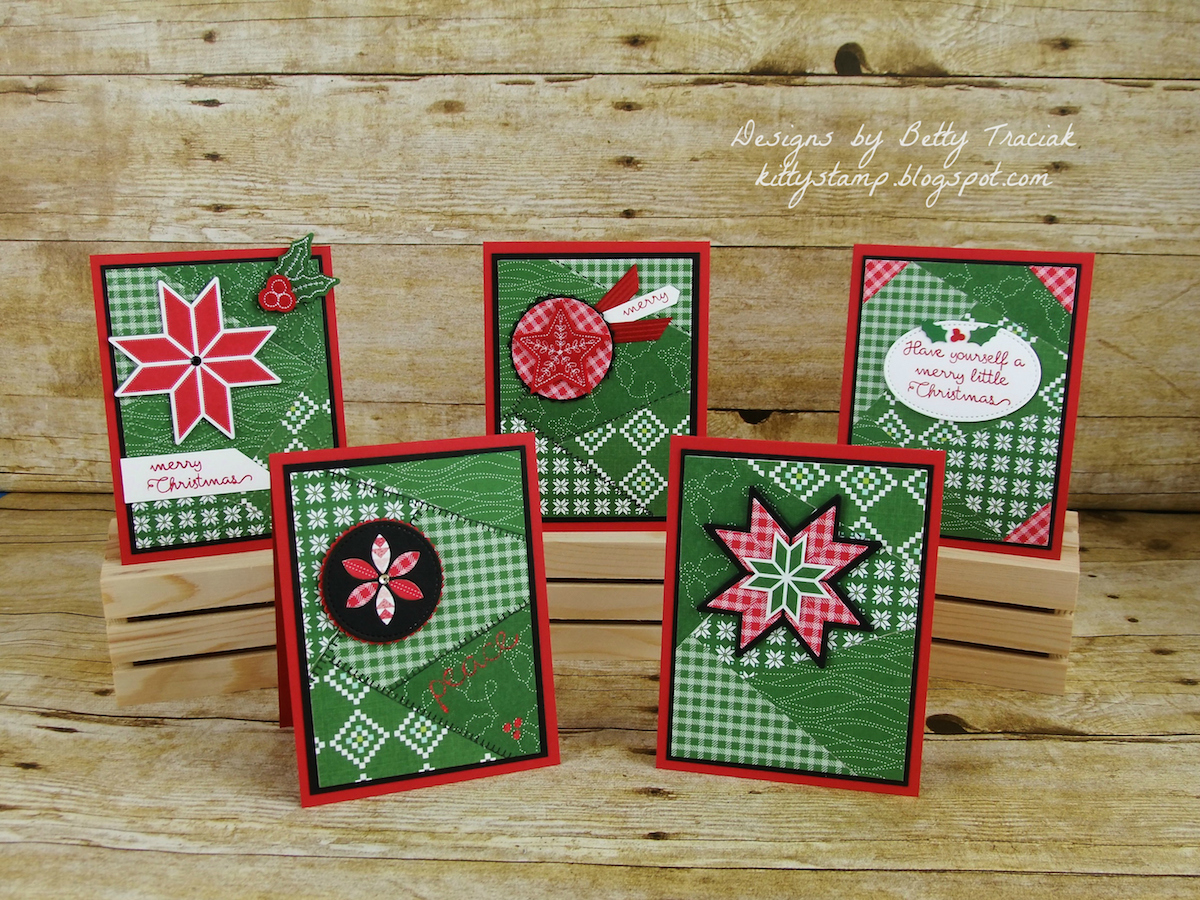
I have a new Christmas version of my Stack and Cut Quilt Cards made just for the weekly Splitcoaststamper tutorial.   These have been in planning mode since I saw the quilt stamps and framelits in the Holiday catalog back in July!

These are really easy to make!  The video is quite helpful in seeing how to do them.  For the written tutorial on the SCS site please click HERE.
Each card has different details and added techniques:

This one has dry embossing, felt embellishments, and a cutout from the Designer Series Paper.

Here the stitching is stamped and I lined up the DSP in the inlay to create a secondary design. There is also a bit of heat embossing in the bottom right.

 I used a marker to draw a variety of stitching lines on this one.

Here I used the framelits to make the medallion - the gingham is my favorite pattern in this DSP!

And for this one I added more gingham in the corners- these were left overs from die-cutting the last card pieces.


Supplies used:
Stamps: Christmas Quilt
Paper:  Quilted Christmas Designer Series Paper, Garden Green, Real Red, Basic Black and Whisper White Cardstock
Ink:  Real Red, Basic Black Stamp’ n Write Marker, Versamark
Accessories: Stitched Felt Embellishments, Rhinestone Basic Jewels, Black Rhinestone Jewels, Black Vintage Crochet Trim
Big Shot:  Quilt Top Textured Impressions Folder, Quilt Builder Framelits, Stitched Shapes Framelits, Layering Circles Framelits
Punches: Classic Label
SaveSave

Tuesday, October 24, 2017

Graveyard Gate Composition Notebook

When back-to-school sales are in season I can never resist picking up a few composition notebooks.  They are the perfect size for so many things and they make a great canvas for creating layouts.

I really had fun playing around with different arrangements of Halloween stamps and papers for this!
The Detailed Gate takes a bit of work to push out all the intricate pieces when die-cutting but it is worth the effort.

Love the lock and key!

By cutting just a section of a graphic design you can get some interesting effects
Stamps:  Graveyard Gate
Paper: Spooky Cat Designer Series Paper, Basic Black and Basic Grey cardstock, Silver Foil
Ink:  Basic Black and Basic Grey Archival Ink, Pumpkin Pie Stampin' Markers
Big Shot:  Detailed Gate Framelits
Punches:  1-1/4" Circle
Accessories:  Fine Tip Glue

Sunday, October 15, 2017

Stamp Review Crew: Spooky Cat Edition


Welcome to the latest Stamp Review Crew Blog Hop.  At each stop you will see ideas using the fun Stampin' Up set Spooky Cat.  We have our blogs permamently linked in a circle but if you encounter any difficulties just click on the banner above to be taken to a complete list of Stamp Review Crew members and blog links.

My spooky projects are all based on the same simple box.  

The little box perfectly fits both a kleenex pack


and fun size candy bars.

By turning three of the boxes on their side I made a mini set of shelves.   A stylish witch needs all her potions and hats organized of course!

The Spooky Cat set has so many cute little stamps.  I feel like I barely scratched the surface using them.  That is one of the wonderful things about the Stamp Review hops... other members will have oodles more samples using all the spooky goodies!  Click on the buttons below to see them all!


Directions for the little box:  
Cut cardstock 2-1/4" X 7"
On the long side score at 2-1/4", 3-1/4", 5-1/2" and 6-1/2"
Turn and score at 1-1/4 along the length.
Cut on the lower scorelines to form tabs and fold into a box.
The handles are 3/4" in width.  I just eyeballed the length for both little baskets.


This way to Mickey's projects!


This way to Cindy's blog!

Stamps:  Spooky Cat
Paper:  Spooky Night Designer Series Paper, Pumpkin Pie, Crumb Cake and Very Vanilla cardstock
Ink:   Pumpkin Pie, Fresh Fig and Wild Wasabi Classic Ink, Basic Black Archival Ink
Punches: Cat and Classic Label

Friday, October 13, 2017

Inking Up the Season Blog Hop


Welcome to the Inking Up the Season Blog Hop brought to you by Inky Friends!  We have a great little hop planned that features winter holiday stamp sets from the 2017 Stampin' Up Holiday Catalog.  

For more info about the Inky Friends stamping group and a list of blog participants please click on the banner below.  


My little project is a set of place card holders for your holiday table using the Season to Sparkle stamps and matching Chandelier Thinlits.
For each holder I snipped off the top and bottom of three chandelier diecuts and glued them back to back leaving the tops unglued to have a space to insert the place card.

The tiny candle stamps are so cute!  I added diagonal lines to them with a marker to make them striped.
There are a bunch of itty bitty stamps in this set for a super variety of occasions.  I think someone really had fun designing this set!

Thanks a bundle for stopping by today!  Please click on the buttons below to see more wonderful wintery ideas!


This way to Sharleen's Merry Little Labels projects


This way to Sara's Smitten Mitten projects
 
Stamps:  Season to Sparkle, Thoughtful Banners
Paper:  Quilted Christmas Designer Series Paper, Garden Green and Whisper White cardstock
Ink:  Garden Green and Real Red Classic Ink,  Garden Green and Daffodil Delight Stampin' Markers
Big Shot:  Layering Ovals Framelits, Chandelier Framelits
Accessories:  Fine Tip Glue

SaveSave

Sunday, October 1, 2017

Stamp Review Crew: Beautiful You Edition


Hello and welcome to the latest Stamp Review Crew Blog Hop!   Our international crew highlights one Stampin' Up stamp set on each blog hop.  Hops are the first and third Mondays of the month and are a great way to get lots of ideas for using a set!   

If you click on the banner below you will be taken to the Stamp Review Crew website which has a complete list crew members and you can see all the past hops as well.
https://stampreviewcrew.blogspot.com/2017/10/beautiful-you.html
Our stamp set this time is the Beautiful You set with lovely sketched figures and lots of sentiments. I used a combination of masking and paper piecing to make this Halloween card.
To make her hat and dress I stamped the image on a piece of Merry Little Christmas Designer Series paper.  (I used Versamark Ink and Clear Embossing Powder.)  When I cut it out I extended the hat into a point to make a witch's hat.
The pretty stamped jewels are from the Season to Sparkle stamp set
Next I stamped the figure on Vanilla Cardstock masking off the right side.    I then I masked the left side and stamped again putting her leg in a position touching the ground.  I liked that this gave her a very "in charge" stance.

On the inside I did a bit of masking as well to change the "Happy Birthday, Gorgeous" to "Halloween".


Beautiful You stamps used
Season to Sparkle stamps used

Thanks so much for hopping with the Stamp Review Crew.  Please click on the buttons below to see more BEAUTIFUL projects!


To Cindy's BEAUTIFUL projects!


To Karen's BEAUTIFUL projects!

Stamps:  Beautiful You,  Season to Sparkle
Paper:  Spooky Cat and Merry Little Christmas Designer Series Paper, Basic Black and Very Vanilla cardstock
Ink:  Wild Wasabi, Pumpkin Pie and Elegant Eggplant Classic Basic Black Archival Ink, Versamark Ink
Big Shot:  Layering Ovals Framelits, Chandelier Framelits
Accessories:  Clear Embossing Powder, Black Rhinestone Jewels, Stampin' Dimensionals