Saturday, February 27, 2010

Explosion Box Goes Digital

OK I am totally excited to share this project with you- a hybrid explosion box!  SU had a challenge for demos to submit projects made using My Digital Studio.  My submission was chosen as one of the winners!

I have been working on various 3D concepts using MDS and I have to say this turned out even better than I thought it might.   The wonderful thing about using MDS for a project like this is that once the template is created it can be used again and again.  Just pop in the pictures, add coordinating digital papers, and dress it up with stamps.  After assembling the box, add hybrid accessories and voila - cute little keepsake boxes!
Here is the scoop on how to make it:


Supply List:
Paper: 
2 - Whisper White cardstock - 8-1/2” X 11” 
1 - Chocolate Chip cardstock - 9” X 9”
1 - Chocolate Chip cardstock - 4-5/8” X 4-5/8”
Sweet Pea Designer Series Paper Pack
Tools:
My Digital Studio
Accessories:
Sweet Pea Stitched Felt

Instructions:
  1. Open a new project in My Digital Studio.  Choose Photo Album - 8-1/2” X 11” Landscape-Create Your Own.  After naming the project select Blank Page.
  2. Add the 1.25” Square Punch to the page from Punches in the Resource Palette. Resize the punch to 2-1/4” square.  Add a Photo Box to the center of the square (Approximately 1-7/8” square)  Use Align function to center Photo Box in punch.
        3.  Group Photo Box and punch.
        4.  Copy and Paste to give a total of 5 squares on the page.
        5.  Arrange squares in cross pattern leaving a small space between each box. Use Align functions to assist in placement.
The first template is complete. 

       6.  Create a second template using punch resized to 2-1/4” square and Photo Box 2” square.

NOTE:  Save these templates.  Make a duplicate page of each before continuing.  Use the duplicate pages to complete the rest of the project.  The templates can be used again and again.  

        7.  Delete the center photo box.  (I left it in my saved template in case I wish to have a photo in the center of another project.  For this project I wanted to add embellishments to the center.)
        8.  Add mats to each punch.  Change color to coordinate with project - in this case Chocolate Chip.  Increase size of mat to 5.
        9.  Add photos to photo boxes.
      10.  Add mat to each photo - in this case Old Olive.
      11.  Select each punch and Paper Fill with paper from the My Sweet Pea Designer Kits.
      12.  Add stamps to photos.


   13.  Print on Whisper White cardstock.  Cut out. Score on mat lines of center square and folds sides up.
   14.  Score 9” X 9” Chocolate Chip cardstock at 3” all around.  Cut out corner squares. 
   15.  Cut 8  2-3/4” squares of Sweet Pea Designer Series Paper.  Adhere to both sides of outside squares of 9” X 9” piece.
   16.  Adhere middle square of larger scrapbook piece to middle of base.  Then adhere smaller scrapbook piece on top. 
   17.  Score 4-5/8” square at 3/4” on all sides.  Cut corner flaps and adhere to make lid.
    18.  Decorate with Sweet Pea Stitched Felt.

To see more My Digital Studio Tutorials CLICK HERE.  More are planned for the future as I get then done!

Tuesday, February 23, 2010

Look whose stampin' now!

I may have a new convert!  Tom wanted a retro looking frame for a poster but couldn't find one so he asked me if I could stamp on one.  As I started to work on it, he decided to give a helping hand.  It turned out great and we had fun working on it together.

Here is the new heat-gun pro:
We silver embossed the retro-looking stars from the SnowBurst set on the black frame.
Hagrid is our ever "helpful" assistant.
Both artists admiring the finished product.

Thursday, February 18, 2010

My Digital Studio Hybrid Love Bandit Frame Tutorial

My Digital Studio is great for creating backgrounds for a stamped project.  For this project I knew I wanted to use the clouds from the Sunny Day Designer Kit so I chose the color palette of Tempting Turquoise, Pink Passion, Pumpkin Pie, and Old Olive.    
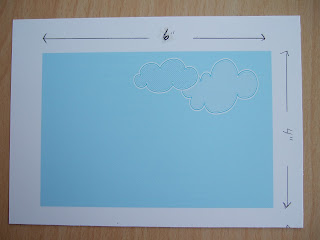
For the sky, I wanted a lighter shade of Tempting Turquoise so I simply reduced the opacity.  How cool is that?!  I love that now I have every SU color in every shade!  Just one more thing you can do with MDS that is not possible with traditional materials.

Also, I did not have any designer paper that I liked for the hills in my stash - so I created them on MDS!  Here is the complete tutorial to make this project:

1.   Open a new project in My Digital Studio. Choose Photo Album - 8-1/2” X 11” Portrait-Create Your Own.  After naming project select Blank Page.

2.   For sky background piece add the 1.25 Square Punch to the page from Punches in the Resource Palette.  Resize punch to 4” X 6”.  Color Fill with Tempting Turquoise and reduce opacity to 32.  From Embellishments choose Designer Kits - Sunny Day - elements.  Add two clouds to upper right corner.  Resize clouds (Striped cloud: width -93, height - 51.  Solid cloud: width - 111, height - 80.)
3.   For green background add 1.25 Square Punch.  Resize to 2” X 6”.  Copy and paste giving two rectangles to fill.  Select Paper Fill - Small Polka Dot - Old Olive.  For last rectangle select Paper Fill - Dotted Stripe - Old Olive.

4.   Print on Whisper White cardstock.  Cut out each rectangle leaving a white border for adhering to frame mat.

5.   Free hand cut green paper into hill shapes.  Layer and adhere to back of mat.


6.   Stamp animals with Chocolate Chip Classic ink on Whisper White.  Color with Stampin’ Write Markers. Cut out squirrel and raccoon.  Punch owl with 3/4” Circle Punch.  Adhere with Stampin’ Dimensionals.

7.   Stamp trunk with Chocolate Chip classic ink on Soft Suede cardstock.  Stamp leaves with Old Olive Craft ink on Pumpkin Pie.  Cut out and layer with dimensionals.

8.   Stamp and punch sentiment using Word Window punch in Chocolate Chip ink on Whisper White. Layer on Tempting Turquoise.
9.   Punch Trio Flowers and adhere to mat.


I have more tutorials in the works.  To see past My Digital Studio Tutorials click here.

One more tip for today.  Make sure your ink pads are well-inked.  I was having trouble stamping the owl for this project.  The stamp was new so I did all the usual tricks for conditioning a new stamp: cleaning it with Staz-on cleaner, lightly sanding etc.  Nothing worked.  Finally it dawned on me to try re-inking the pad.  The image on the right is what they looked like prior to re-inking.  What a difference!  Something so simple but easily forgotten.
 

Supplies:
Stamps: Love Bandit
Paper: Whisper White, Pink Passion, Pumpkin Pie, Tempting Turquoise, Old Olive, Soft Suede
Ink: Chocolate Chip (Classic), Old Olive (Craft)
Adhesive: SNAIL, Sticky Strip, Tombow Multi Purpose Adhesive
Accessories:  My Digital Studio, Stampin’  Write Markers - Pink Passion, Pumpkin Pie, Tempting Turquoise, Blush Blossom, Punches - 3/4” Circle, Word Window, Trio Flower, Stampin’ Dimensoionals, purchased frame (4” X 6” opening).

Sunday, February 14, 2010

Organize Your Chocolate, Announcement and Blog Candy Winner

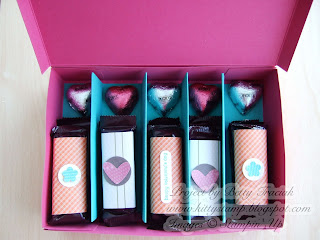
I sent this box of chocolates to my grandma for Valentines Day.  The pattern for the box was designed by  Natasha Zandbergen  for UStamp.
I have been anxious to use some of the bold patterned paper in the Sweet Pea DSP Stack.  This box top was the perfect size to show off the pattern of the paper.   I added Sweet Pea Stitched Felt Pieces, few punched birds and it was done!
Natasha's box held office supplies.  I reorganized the interior sections to fit Hershey bars and Dove Hearts.  Lots of room for lots of chocolate!


Now for my fun announcement.  I have been invited back as a guest designer for the next round of UStamp- Spring Soiree 2010.  Designers are already at work behind the scenes on all new projects.  You can learn all the details by clicking on the banner below.  There is an early bird special you will not want to miss.
And to celebrate the winner of the today's blog candy will receive a FREE PASS to UStamp-Spring Soiree.   I entered all names for comments left this week on random.org list generator.  You can see the screen shoot here.


As you can see Lynn is the winner of the pass.  Congratulations!!   I will have another pass to give away in the near future so keep checking back.  I appreciate all comments - it lets me know there are readers out there!


Saturday, February 13, 2010

Whirl-a-Round 3x3 Desk Caddy

Blog candy this week:
 Actually I can't tell you what is yet! It is a surprise. How about that? To be entered in the random drawing just leave a comment on any of the posts this week (including Monday's "kitty post"). For every comment, I will "throw your name in the hat". On Feb 14th, I will announce a fun tidbit of news and the winner of the blog candy. So check back for blog updates throughout the week!


Today is my day on UStamp!  This is the project I designed: a desk caddy for 3x3 cards with matching pen.
This is an idea that I have been mulling over for some time.  I had the basic idea but was not completely satisfied.  When I saw the Heart Treat Cups the final piece of the puzzle fell in place.  The treat cups hold the cards in the right position to display them!  And you can put fun little things inside - mine has heart confetti.
 It holds a LOT of cards.  16 cards and envelopes fit easily.
The Love You Much stamps fit so nicely for this.


  Complete instructions plus tons more can be found here

Wednesday, February 10, 2010

Humane Society Fundraiser

Blog candy this week:
 Actually I can't tell you what is yet! It is a surprise. How about that? To be entered in the random drawing just leave a comment on any of the posts this week (including Monday's "kitty post"). For every comment, I will "throw your name in the hat". On Feb 14th, I will announce a fun tidbit of news and the winner of the blog candy. So check back for blog updates throughout the week!

My neighbor has put countless hours into organizing a fund raiser for our local Humane Society.  The event takes place this Saturday February 13 in Lansing's Old Town at the Spiral Center Dance Club (1247 Center St, Lansing MI).

Here is the gift basket I made to donate for the raffle.  It has four cards and envelopes, a post-it-note stand, a covered notepad, matching pen and a decorated bottle of kitty treats.
Each cat image is a little different.  I sponged soft suede, crushed curry and dusty durango ink to make a calico kitty, basic gray with black marker stripes for a gray tabby, apricot appeal with dusty durango marker for an orange tabby, and soft suede alone for a brown kitty.  I tried several different things to come up with a siamese but none were satisfactory.

The post-it note stand is a clear photo frame turned upside down.
Notepad is a mini legal pad.  I covered it with one sheet of 8-1/2 X 11 paper.  I used a centering ruler to find the center and made two scores 1/4" apart for the spine of the cover.
I filled a Starbuck's Frappacinno bottle with kitty treats.  They just happened to match the dusty durango cardstock perfectly and were heart and fish shaped.  Couldn't have planned it better if I had tried!
Hagrid had to inspect and give his approval.
Supplies:  Cardstock - Dusty Durango, Bermuda Bay, Pumpkin Pie, Whisper White.  Paper - Welcome Neighbor.  Stamps - C is for Cat.  Ribbon - Striped Pumpkin Pie. Punches - 3/4, 1, 1-1/4, 1-3/8, 1-1/2 circle. Ink - Dusty Durango, Crushed Curry, Soft Suede, Basic Gray, Apricot Appeal  Markers - Dusty Durango, Basic Black

Tuesday, February 9, 2010

Blog Candy and UStamp Swap Cards

My mailbox was bursting with hearts yesterday as I received a wonderful stack of swap cards from fellow UStamp members from around the US. Some I know who created them, a few were unsigned.

Just look at this cute little owl! It has a peek-a-boo window done with the Movers and Shapers die and an edge done with the pinking heart punch.


This card has lots texture! Clean and classy.


Heather Dean created this next card. It has so many luscious layers and the paper pieced birds are cute, cute, cute! (I love the chocolate chip one with flowers!)


This red and vanilla card is very rich looking with lots of embossing.


Mary Fife created this adorable gate fold card. Wonderfully colored and the little letters in the bears paws are hand-cut.


Next is a pretty pink card using the Scalloped envelope die. The pink designer paper is stunning and embossed heart just sets everything off.


Natalie Gramley designed this adorable bear card. He is holding a little stamped gift bag with punched heart. Fun!

Next up is a wonderful card by Sue Blankenship. We have had fun getting to know each other on live chats. Lots of texture offset with a delicate strip of punched edging make this a gorgeous card.

This next card is a knock-out in real life. There are dry embossed lines on either side of the hearts and white gel pens surround each heart.

Judy Holland created this beauty. The background papers are done on MDS! Lots of layers and heat embossing. Wow!


Now for the blog candy. Actually I can't tell you what is yet! It is a surprise. How about that? To be entered in the random drawing just leave a comment on any of the posts this week (including yesterday's "kitty post"). For every comment I will "throw your name in the hat". On Feb 14th, I will announce a fun tidbit of news and the winner of the blog candy. So check back for blog updates throughout the week!